 10/01/2012
- Yarn Bowl
10/01/2012
- Yarn BowlWe get lots of great things donated at work and I love the idea of reusing as much as possible. The one thing I despise though are the jumbled masses of thread, yarn, etc. I took one of those messes and turned it into a bowl.

10/02/2012
- Paper Mache Skull
It was time to get my Halloween on with a paper mache skull. Actually, my true inspiration was from having leftover flour paste from the yarn bowl. I didn't have any balloons to use to make the skull over, so I wadded up paper and worked around it to make the skull. It took about 4 days to fully dry...and try to keep Zoe away from.
It was time to get my Halloween on with a paper mache skull. Actually, my true inspiration was from having leftover flour paste from the yarn bowl. I didn't have any balloons to use to make the skull over, so I wadded up paper and worked around it to make the skull. It took about 4 days to fully dry...and try to keep Zoe away from.
 10/03/2012
- Map/Paint Piece
10/03/2012
- Map/Paint PieceEveryday I drive to work I see one of the best road signs ever (and I will again note that I am enamored with road signs) that warns cyclists to watch out for the rail tracks. Since the map I had decoupaged onto the wood block focused on Portland, I thought it would be fun to paint the sign on it.

10/04/2012 - Aluminum Flower and
Sun
I sacrificed $.10 worth of deposit to cut down aluminum cans into these shapes. Since I keep forgetting to cash in my slips, I think I can let the dime go. I like the sun much better than the flower. I was thinking that I could etch (I don't think it should be called etching, but pressing sounds weird) a face into the sun, but the aluminum at the bottom of the can was too thick to let me do that.
I sacrificed $.10 worth of deposit to cut down aluminum cans into these shapes. Since I keep forgetting to cash in my slips, I think I can let the dime go. I like the sun much better than the flower. I was thinking that I could etch (I don't think it should be called etching, but pressing sounds weird) a face into the sun, but the aluminum at the bottom of the can was too thick to let me do that.

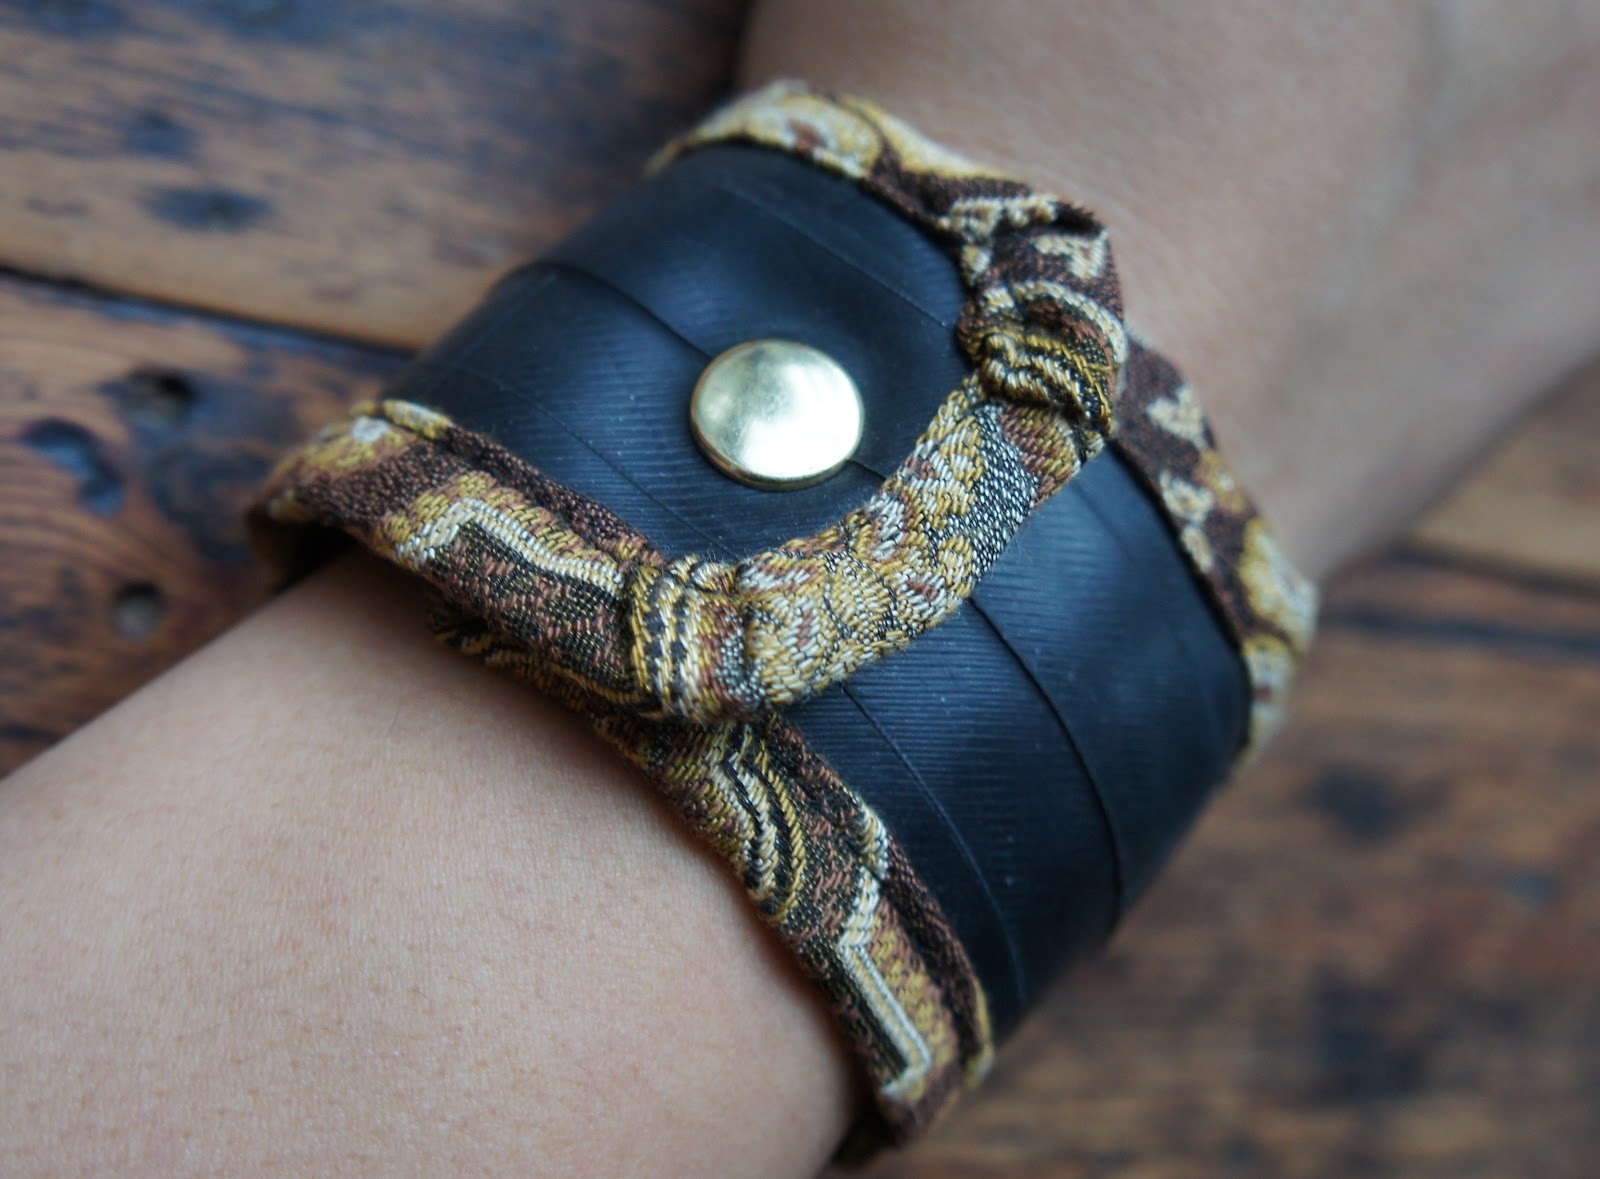
10/05/2012 - Multi-strand Rubber
Necklace
I had to take a break from my love affair with making wrist jewelry and made a necklace. I made it similar to the strand bracelet except I made the strands longer and added more chain links. The only thing I don't like about this is how I threaded the links. Other than that, it turned out quite lovely.

10/06/2012
- Hot Dog Wrapper Wristband
My hubby got tickets to the Oregon Ducks game so I took the opportunity to get my craft done during halftime, show my support for the Ducks and keep some garbage out of the landfill. I folded a hot dog wrapper into a wristband so "Oregon" was still visible. Go Ducks!

10/07/2012 - Toy Wire Spider Web
More Halloween! I think I just about depleted my supply of toy wire making this web. I like that the plastic coating made it look more webby. The only thing I should have done was attach it to an empty frame.

10/08/2012 - Rubber Bats
I have to admit I borrowed this idea from a former coworker, who borrowed it from Martha Stewart. There are a few renditions I have seen of this, but of course, I had to use rubber inner tubes. Inner tubes are seriously the best material for making Halloween decorations. We ended up with a dozen "hanging" around.
I have to admit I borrowed this idea from a former coworker, who borrowed it from Martha Stewart. There are a few renditions I have seen of this, but of course, I had to use rubber inner tubes. Inner tubes are seriously the best material for making Halloween decorations. We ended up with a dozen "hanging" around.

I bought a bunch of comb binding from work and thought it would make fun legs for spiders, but wasn't sure what I was going to use to make the spider bodies. My first thought was to roll up inner tubes into balls, but that felt pointless. I took empty prescription bottles and hot glued the "legs" onto the bottles. Zoe, Grandma BJ and I had fun painting and decorating these little guys. I thought it would be cute to put little treats in these, but it seems inherently wrong to put candy in old prescription bottles, no matter how it is disguised.
(Zoe did this cute eyeball smile.)
(Zoe did this cute eyeball smile.)
 10/11/2012
- Fish Tail Cuff
10/11/2012
- Fish Tail CuffI made a skinnier version of a fish tail cuff by slitting a line lengthwise and braiding thin strips through it for the fish tail effect.
 10/12/2012 - 2nd set of
Rubber Bats
10/12/2012 - 2nd set of
Rubber Bats Grandma BJ asked me for some of the bats for one of her friends who loves Halloween. I made few more of these little guys for her and we gave her one of the little spiders we made as well.
 10/13/2012 - Chain Link/Rubber Bracelet
I think I have figured out the best way to thread the rubber through the chain links to get it to lay properly with this bracelet. It turned out sweet and simple.
 10/14/2012
- Red Tire Cuff
10/14/2012
- Red Tire CuffEvery once in a while I get lucky enough to get my hands on colorful bicycle tires. I sliced up the red tire and rounded the edges to make it look finished. I did struggle to attach the snap because of the thickness though. One issue with the colored tires is that the dirt really shows since I use discarded materials.

10/15/2012 - Mini Round Basket
I rescued a broken woven basket from work just so I could copy the weaving method used to make it. This didn't turn out to badly since I haven't tried this method before. It is a little messier than I would prefer, but it was a great experiment.
 10/16/2012 - Red Tire Cuff with
Metal Design
10/16/2012 - Red Tire Cuff with
Metal Design
I can't decide if this is cheesy or not. I used some more of the red tire and sliced slits along it to weave a piece of black rubber through and attached this southwestern thingie to the front. Maybe back to the drawing board.

10/17/2012 - Rubber Hula Skirt

10/17/2012 - Rubber Hula Skirt
I started making this to wear to the coolest event in Portland, the Rebel Craft Rumble. It didn't look quite as good as I was hoping (based on the look on the hubby's face) so I ended up dusting off an 80s outfit. I think I will cut the pieces skinnier to make it look fuller and avoid any possible eye-rolling.
.jpeg) 10/18/2012 - Rebel Craft Rumble Pin
10/18/2012 - Rebel Craft Rumble Pin
I realize this is a bit of a cop-out since I was going to the coolest craft event in town. My manager spray painted some old pin back buttons and gave me one to wear. I borrowed one of her awesome slogans and made it sound a little bit tougher.
 10/19/2012
- Zoe’s Witch’s Skirt
10/19/2012
- Zoe’s Witch’s Skirt
I had been debating on buying some fabulous neon yellow tulle from SCRAP for a few weeks because I thought it would look so cute as a witch's tutu. I was delighted when Zoe said she wanted to be a witch. I got some black tulle and cut it into strips. I tied the strips around a long piece of rubber (great substitute for elastic for this project!)
 10/20/2012
- Chain Roller Dangly Earrings
10/20/2012
- Chain Roller Dangly Earrings
I was inspired to make these by a really cute customer at SCRAP who was at the Reuse Conex. She was wearing an earring that was made of a bunch of circles that were wired together to make a diamond shape. I thought that would look neat if I did that with the chain rollers (I thought they were call chain spacers for some reason, but rollers makes more sense because they make the chain roll, hmmm). I made a few pairs that were long and dangly with one line of rollers hanging down and also made a pair with two lines.
 10/21/2012 - Marbled iPhone Box
I am amazed at that some packaging is nearly indestructible and yet the product inside breaks down so easily. Thankfully my new phone hasn't broken yet, but either did the box. Zoe and I learned how to marble paper from a crafty and talented former coworker, Keri. Zoe had drawn designs on white paper and she marbled the paper. Keri also had some old sheet music, pages and fabric that I got to marble. Very cool process.
 10/22/2012 - Rubber Feather
 This is the start of a bigger project I am hoping to get to soon. It actually took be close to an hour to cut all the little lines in the feather. I cut it so the seam of the inner tube would look like the middle of a feather. I need to figure out a way to make them faster because I need quite a few for my project.
 10/23/2012 - Giant Rubber Spider
Web
10/23/2012 - Giant Rubber Spider
WebZoe was really excited helping me with this project. I cut long strips of inner tube and we taped and tied the pieces up as we went along. Zoe was afraid it was too sticky from the spider and ran to get a (sopping) wet towel to clean it off.

10/24/2012 - Link/Roller Bracelet
I spent a few hours the week before just breaking up chains for the parts. It usually takes a few days to get my hands clean again after doing that and I look like a mechanic. I linked the chain and roller pieces together to make this bracelet. I have been experimenting with different closures and used one where the rod goes through the circle to hold it on.
I spent a few hours the week before just breaking up chains for the parts. It usually takes a few days to get my hands clean again after doing that and I look like a mechanic. I linked the chain and roller pieces together to make this bracelet. I have been experimenting with different closures and used one where the rod goes through the circle to hold it on.
 10/25/2012 - Chain Mail Cuff
This "chain mail" is from a sample metal window shade. I thought lacing rubber through the ends was a brilliant plan, until I tried to fit it over my hand. Because I laced the rubber through all of the end pieces, it made it so that it wouldn't stretch as easily. I forced my hand through and like the way it looks, but not the process of getting it on. I think I should redo the lacing.
 10/26/2012 - Fabric Sale Sign
I made this sign for our awesome monthly fabric sales we have started doing at SCRAP. I used part of an old swimming pool liner to make this. I figured the sign could be reused if it was on a more durable material (Also will hold up to Oregon rain). The only problem is that I am too much of a perfectionist and this took me longer than I thought it would, but I am happy with how it turned out.
 10/27/2012 - Valve Stem Lady
I have hundreds of valve stems I have cut off from using the rubber inner tubes to make baskets and such. I need to donate them to SCRAP, but I wanted to try to make something with them, so I made this little lady to attach to Zoe's bicycle handlebar and hang out with her as she rides. This turned out cuter than I thought it would.
 10/28/2012 - Mesh Fingerless
Gloves
10/28/2012 - Mesh Fingerless
Gloves
What better use of orange fruit bags than to make fingerless gloves? I was going to wear them to work for Halloween, but didn't think they would last too long. I hand stitched the mesh to fit my hands. Let me take a moment to give props to this cool hand I bought for $2 at SCRAP. It makes picture taking much easier since most of my projects seem to be wrist or hand related.

10/29-30/2012 - Witch’s Cape
I present to you the cutest, sassiest little witch around. This cape was sewn with a black knit velvety fabric and lined with a water-resistant fabric scrap. Both from SCRAP, of course. The pink lining was scrap fabric donated from Columbia Sportswear, so I thought it would be good to keep the little one somewhat dry for trick-or-treating.
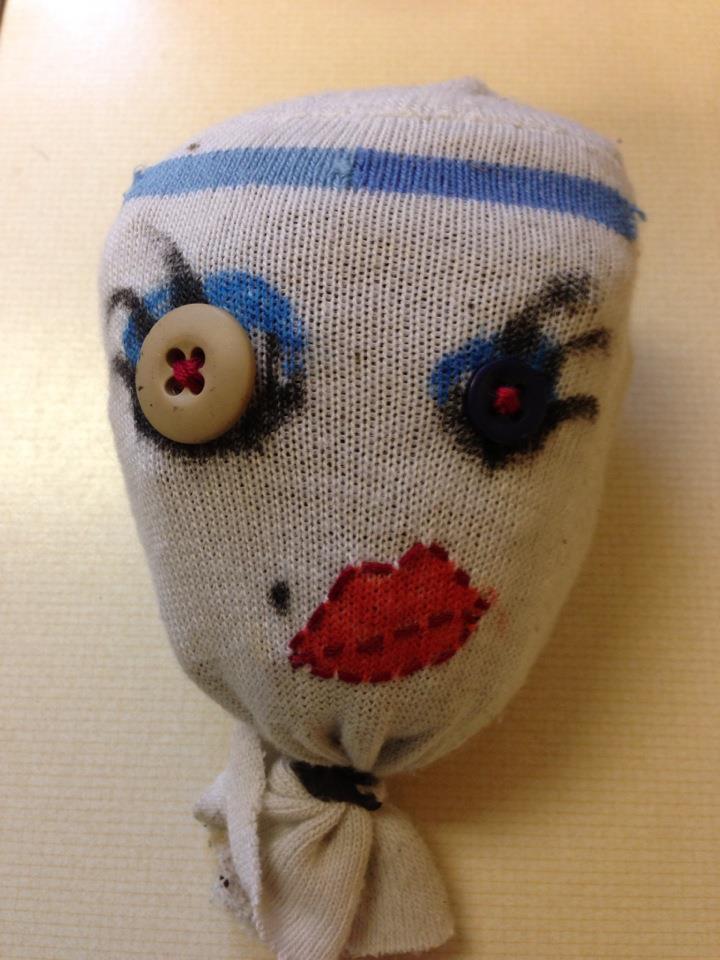 10/31/2012
- Sock Buddy
10/31/2012
- Sock BuddyI finally tried out a craft from a book written by one of the funniest ladies I have ever met, Miss Demeanor. If you are looking for a hilarious and awesome gift idea, give this book, Criminal Crafts. I had to do a bit of surgery to repair the holes in this sock before I turned it into a sock buddy, but hopefully the grass will grow in well enough to cover it. She does look like she has seen better days, but I still love her.


