Sunday, January 29, 2012

01/28/2012 - Rubber "Film Strip" Cufflet

Third time is a charm...sometimes. My first try was a macrame-type bracelet from strips of inner tube that I just could not get to work just right. The second was using an X-acto knife to cute shapes into the rubber and still didn't look right. Finally, I just used a square craft punch and it turned out to look like a film strip.
 
Reclaimed Material: rubber inner tube, ribbon, snaps from SCRAP
Other/New Material: electrical tape
Tools: scissors, square craft punch, hammer and snap setter, hole punch

How I did it: I cut a piece of inner tube 1.25" x 8.25" for the base of the cufflet. I used the square craft punch and punched 5 squares evenly spaced on the rubber, leaving about an inch of rubber on both ends to set the snaps. I cut the ribbon 9.25" long and folded each end under .5" and lined it up with the rubber to make sure it was seen through the squares. I punched the holes for the snap placement through the ribbon and rubber and set the snaps. I cut the electrical tape into this strips and used the strips to hold the ribbon in place lengthwise.

What I would do differently: After I punched the squares and put the ribbon behind the rubber, it reminded me of film strip. I think it would be fun to use actual film instead of ribbon. I am also going to revisit my first two attempts for this day. I am 99% sure that other inner tube pieces I have seen are laser cut because I have tried for years to make intricate cuts into the rubber.

01/27/2012 - Aluminum Flower Hair Pins

This is an easy and cute way to snazz up bobby pins or old barrettes.

Reclaimed Material: aluminum can, beads from SCRAP, old wire
Other/New Material: bobby pins
Tools: small flower punch, straight pin

How I did it: I used the flower shaped craft to punch out four flowers from the aluminum, two blue and two silver. I put one blue flower over a silver one and used the straight pin to poke holes in the centers of the flowers. Then I cut a piece of the wire about 2" and threaded the bead onto the wire and pulled the two ends of the wire through the centers of both flowers. I wrapped the wire around one side of the bobby pin, trimmed the excess and tucked in the edges. I repeated it the steps with the second bobby pin.

What I would do differently: I thought I was being clever by reusing a piece of wire from a string of beads I purchased, but this only made this project take about 10x longer than it should have. I was happy to reuse wire, but I would have saved myself a lot of time by using jewelry wire which is more pliable. I will try this again using other shapes and material like colored plastic bits from lids or laundry soap bottles.

Friday, January 27, 2012

01/26/2012 - Doll Skin Tattoo Bracelet

I know the title sounds morbid, but really, it is just plastic. I have been wanting to do something with doll parts that I had and this is what I came up with. I figured if kids like to color and draw on their plastic dolls, I would give it a try too. Also, if you don't want a tattoo, you can use doll skin as an alternative lol. 


Reclaimed Material: discarded doll torso
Other Material: none
Tools: scissors, nail file, Sharpie markers 

How I did it: I cut a ring from the torso of the doll body about 1/2" wide. The plastic was a bit thick, so the edges were not clean. I used a nail file to smooth the edges. I drew the tree branch design around the bracelet then decided it needed a little color and added little green leaves.

What I would do differently: I couldn't find the sandpaper, so I used a rough nail file, next time, I will save the file and use sandpaper. Maybe the doll arms would make good rings.

Thursday, January 26, 2012

01/25/2012 - Plastic Lid Quote Magnet

This wasn't as ambitious as the previous project, but was still fun. I was originally going to make a photo frame, but changed my mind when I saw this neat picture in an old newspaper and the car reminds me of my new home, Oregon. This is an easy craft for everyone. 

Recycled Material: plastic lid, newspaper, cardboard
Other Material: clear nail polish, magnet
Tools: X-acto knife, glue, Sharpie marker, paint pens

How I did it: I used a lid from an empty raisin container and cut out the inside, leaving about a 1/8" border from the rim. I then cut the cardboard and newspaper to fit tightly inside the lid and glued the paper to the cardboard. I used the paint pens and Sharpie to add small touches of color to the picture then popped it into the back of the lid. There is probably a better way to do this, but I squeezed some good ol' Elmer's glue along the edges between the cardboard and plastic to hold it in place and wiped off the excess. I cut a magnet sheet to fit and glued it onto the back of the cardboard and let it dry. The picture was still missing something so I painted it with clear nail polish. I liked the effect because it pulled the newspaper print from the back side and gave the car a little more personality.
 
What I would do differently: I cut the plastic by hand, but next time I will use a straight edge to get a nice cut.

Wednesday, January 25, 2012

01/24/2012 - License Plate Art, Part Deux

Yes, this project looks exactly like the one from the day before. This is the finished product that ended up taking me longer than I thought it would (finished it up today - the 25th) but I really loved how it turned out.

Recycled Material: license plate, rubber
Other Material: paint
Tools: paint brushes, palette, scissors

How I did it:  I painted the 3rd plate similar to the other two, but added a yellow flower because it made me smile. I a couple strips of rubber about 1/4" thick, painted the strips then used them to tie the plates together. I did a round braid to make the top hanger. I painted the strips blue but they look really dark painted on the black rubber.

What I would do differently: Again, I am happy with how this project turned out, so there is nothing I would do differently. Since this project stretched over 3 days the project for the 25th is just a little one.

Tuesday, January 24, 2012

01/23/2012 - License Plate Art

My original plan was to make a photo album using two of our old Illinois license plates. I started out by painting the plates (sorry Abe Lincoln) and cut out album sheets I got at the SCRAP store. It has been a very, very long time since I have had a chance to just sit and enjoy painting a non-house or child-related project. I really got into these paintings and stayed up way to late working on them. I couldn't bring myself to just turn the paintings into a photo album, so this project is just art.

Recycled Material: license plates
Other Material: paint
Tools: paint brushes, palette

How I did it: I don't think people realize just how dirty their license plates get until they have to remove them. I washed the plates then dried them to prepare them to paint. I used a thick acrylic paint, except for the silver paint. I painted about three coats as the base then let the paint dry. I then painted them with the design I wanted and let the pieces dry. The end...short and sweet.

What I would do differently: I am making a coordinating piece and will put them all together for the 1/24/12 project. There are a lot of cool things people do with license plates and maybe I will eventually make a license photo album since I already have the inserts ready to go.


Monday, January 23, 2012

01/22/2012 - Plastic Boa - oooh la la

Let's play dress up! I made this fun boa for my daughter who likes to dress up from being a princess to being an explorer. This is a surprisingly easy project that just about any age can do...you just need lots and lots of newspaper bags (thanks Mama Jan for saving them for me!). At the office building I worked at in Illinois, my coworkers and I used to grab all the bags (we didn't take their newspapers) from the other office suites on our way in everyday, so we amassed quite a collection. This doesn't have to be just for kids to use...this could be fun if you are trying to save money at a bachelorette party.

Recycled Material: plastic newspaper bags
Other Material: none
Tools: scissors 

How I did it: The first thing I did was take two of the plastic newspaper bags and cut them lengthwise so when I laid it out, the length doubled. There were seams on both sides that I used as a cutting guide. I bunched both pieces together lengthwise and tied them together to use as the base, leaving about 2" hanging off the knot and made the length about 4'. At first I started tying whole bags onto the base, but realized I would run out before I covered the entire base, so I folded the bags in half lengthwise and cut them in half. I then folded the smaller piece in half and tied it once around the base. I continued this until I covered most of the base leaving about 3" or 4" on both ends. I knotted the ends about 3 times in the same place to keep the smaller bags from sliding off and made sure that the knots of the smaller bags at the ends were really tight. I used the scissors to trim the bags down so they were all even and also to cut down the bag bottoms that were still intact. Once I trimmed the pieces down, I fluffed up the pieces and had a fun, flirty boa. I stashed the trimmings to use for a plastic fuse project later on down the road.


What I would do differently: This is a pretty easy project, so there isn't much that I would have done differently, other than paying attention to the order of colored bags. One side has more color than the other, but this is what happens when I am on a roll. This could be done using grocery bags or any other thin plastic bag, but would require a lot more cutting. This project is actually quite fool proof and easy to change anything you don't like. Once I get more bags, I am going to make a matching tutu.

Sunday, January 22, 2012

01/21/2012 - Aluminum Wrist Cufflet

I don't know if the proper term for this is "cuff" or "cufflet" so I will go with cufflet because it sounds fancier. The black fabric is sexy fabric I found at SCRAP, one of my favorite places in Portland. They take donations of scrap material from businesses and individuals and resell it to fund their school and community programs. The place is an artist's/teacher's/crafter's/garbage picker's (me) dream come true. I am going next week to start my volunteer training, hooray!

Recycled Material: aluminum can, SCRAP fabric, old ribbon
Other Material: decorative brads
Tools: scissors, ruler, X-acto knife, Crop-A-Dile, double-sided tape, rubber electrical tape

How I did it: I cut the top and bottom off the aluminum can then cut a vertical line to open the can body. There is usually a line down the side of the can by the nutritional information and the print overlaps that I use as a guide to cut a straight line. I cut the can body so it was about 3.25" in height and left the length of the can, about 8" to fit my wrist. I marked the aluminum horizontally down the center .5" apart for placement of the brads, used the X-acto to poke little horizontal notches on the marks, and inserted the brads. I used the electrical tape to hold the brads in place on the back of the aluminum. I folded the top and bottom of the aluminum down towards the front a little less than .5", but did not press the aluminum all the way down until the fabric was attached. I cut the fabric 2 inches larger than the aluminum to have room for the edging. I lined the double-sided tape under the aluminum fold, taking care to make sure none would be sticking out from under the fold. I tucked one edge of the fabric under the fold so the back of the fabric stuck to the tape then wrapped the fabric over the back of the aluminum. I applied the double-stick tape to the bottom fold and then trimmed down the fabric a bit to make sure the fabric would be flush with the fold when I tucked it under the aluminum. I pressed the folds flat with my hands, but pliers can be used, which helped hold the fabric in place and to make sure it adhered to the tape.

The short ends of the cuff were too thick to fold so I used the rubber electrical tape to cover the edges. I used the Crop-A-Dile to punch 3 holes and set 3 eyelets on each end of the bracelet. The final thing I did was to lace the bracelet like a corset (or shoe, but corset sounds saucier) and tie it off. 

What I would do differently: My original plan was to try to stitch the fabric to the aluminum, but I got sidetracked watching Wall•E with my family and ended up making it by hand. I still need to experiment sewing on aluminum, so that will have to happen with another project. There seem to be many things I would have done differently with this project. I don't think it was necessary to do the fold down, other than it give the fabric and tape a stronger hold. I need to use a better eyelet next time, but I used up the ones I had left. The ribbon does seem like overkill for this bracelet, so I will most likely change it out regardless. I chose the blue fabric scrap to pull out little accents of clue from the fabric, but the piece I ended up cutting didn't have blue on it.

Saturday, January 21, 2012

01/20/2012 - Keepsake Tin

Altoids® tins are quite wonderful...first they are filled with a curiously strong mint, then you are left with a handy little contraption that has all sorts of uses and they are fully recyclable. My collection of the tins has grown over the years and I kept thinking, one of these days I will make something fun with those. The original plan was to build my house work robot, but I am just sticking to decorating it for keepsakes for now.


Recycled Material: Altoids® tin, metal scraps, random bits from SCRAP, #2 plastic lid
Other Material: spray paint, paint pen
Tools: painter's tape, hot glue gun, scissors, cardboard box or newspaper


How I did it: I used the painter's tape to tape down the overlapping edge on the bottom of the tin where the lid closes then used leftover black spray paint to paint the outside of the tin and let it dry. While it dried, I used another Altoids® tin as a template to trace the raised border on the lid onto the plastic lid. It was helpful that I could see the border through the lid and marked and cut the border shape, the trimmed the piece a little bit smaller than the tin border. I was going to leave the blue lid as it was, but ended up using a gold paint pen to color it because my random scraps had a gold-ish theme. Once the tin was dry, I used the gold paint pen to paint the raised border on the tin. I hot glued the plastic piece to the tin and let it set. After arranging the random bits, I hot glued the pieces on and let them set. The tape was removed and I let the tin dry completely. There was a hot glue blob that escaped from under the plastic and when I pulled it off, some of the black paint came up with it. This worked out because I ended up making random scratches on the paint to go with the worn look of the decorative pieces.


What I would do differently:  The nice thing about this project is that there are so many ways to do this differently. This could be done as a kid's craft by gluing paper over the brand cover or painting it by hand. Just about anything can be used to decorate the tin. I am happy with the scraps I found and used and they are meant to represent what can be stored in the tin. Lots of fun and I recommend giving this a try with your own spin!

Friday, January 20, 2012

01/19/2012 - Pop Tab Bowl

I was curious to see if I could make a little change or jewelry bowl by weaving pop tabs together. This took me much longer than I thought it would and didn't quite turn out how I pictured it in my mind. I guess this could also be used as a doll hat instead.


Recycled Material: aluminum pop tabs
Other Material: ribbon
Tools: scissors, small safety pin, long nosed pliers


How I did it: I began by weaving the bottom row of tabs together then added another row by using the ribbon to weave the bottom of the second row of tabs to the tops of the first row (I will create a detailed instruction page with photos on how to weave pop tabs at a later date). I then pulled the ends of the ribbon to form a circle with the woven tabs and tied the ribbon off. I thought about stopping there and just making a flower brooch, but I would have just wondered...what could have been, so I kept going. For the third row, I used the pliers to bend the tabs in half between the top and the bottom then used the ribbon to attach it to the second row. I added three more rows, tying off the ribbon as I completed each row.


What I would do differently: I think my vision would have come to life if I used wire so that I could have shaped the bowl better. The ribbon is too soft to hold the shape very well. I may try soldering tabs into a bowl and see what happens. I also thought about turning this into a tulip somehow since that is what it looks like to me.

Thursday, January 19, 2012

01/18/2012 - Tic Tac Toe Game

Sometimes things "speak to me" and this aluminum tray from a package of frozen bread seemed to be screaming to me "I want to be a tic tac toe game! I want to be a tic tac toe game!" This was fun to make and is on the refrigerator now for my family to enjoy.

Recycled Material: aluminum tray, game pieces
Other Material: round magnets, magnet sheet 
Tools: hot glue gun, multi-purpose glue


How I did it: I had some printable magnet sheets left over from a project from a few years ago and cut one of the sheets down to fit the back of this tray. I used the multi-purpose glue to affix the magnet sheet to the back of the aluminum. (Hot glue and aluminum do not play well together.) I used 10 checkers pieces (5 of each color) and hot glued a round magnet to the back of each of the game pieces. I let the magnets cool/dry and stuck it on the fridge.

What I would do differently: I have a stash of random game pieces so I used the checkers pieces, but this would be just as fun using bottle caps, milk tops or other plastic caps. I left the edge on the aluminum for easy storage for the pieces when it was taken off the fridge since the back magnet was too weak to hold the checker magnets.

01/17/2012 - Aluminum Animal Sculpture

My sweet grandmother-in-law, Betty June, showed me a picture of a sculpture she saw in a magazine of a horse made from a steel drum. She asked me to try to make something like it, so this is my rendition of it.

Recycled Material: aluminum tray
Other Material: none 
Tools: scissors


How I did it: The aluminum that I used was a mini loaf pan. I loosely folded the pan in half lengthwise being careful not to crease it. I pinched one side of the pan down for the head then cut the opposite side to make a tail. I cut up to what would have been the base of the loaf pan if it was still intact. I cut it a little bit wider than the end product to fold down to avoid sharp aluminum edges. I estimated the leg placement and cut it so there was enough aluminum to wrap the legs in a semi-cylinder. I also left extra aluminum to fold the edges along the body. I cut out the head shape on the pinched section of aluminum. After folding down all the sharp edges I made the legs then had to make sure the body kept it shape by loosely using my hands. I bent the front leg of the horse because it was not even with the rest.

What I would do differently: If I do try something like this again, I will use aluminum from a soda can because the pan aluminum is thinner and wrinkled. I think an elephant would be fun to try. 

01/16/2012 - Game Card/Toy Wire Notebook

This is a very simplistic project, but was fun to do. The game cards are from an old Magic Trolls game I intercepted from the garbage. The paper I just pulled out of our recycling bin and I found another use for the toy wire - hooray me!

Recycled Material: game cards, paper, toy wire
Other Material: none 
Tools: paper cutter, small hole punch, round pencil, long nosed pliers  

How I did it: I trimmed about 25 rectangles to the size of the game card using the paper cutter. If you don't have one, this can be done by hand with scissors or sneak into a FedEx Kinko's to use their fancy paper cutters. I made sure the printed side of the paper was facing down and used 2 cards, one for the front and for the back. I took a shorter piece of the toy wire (about 7" long) and wrapped it tightly around the round pencil to make the coil and ended up with 7 loops. I stretched the coil as evenly as possible to the length of the top of the cards and paper then evenly marked the placement for the holes on the back of the front cover and punched 7 holes. I used the cover as a guide, then took about 5 sheets of the paper and made them flush with the card and punched the holes in the paper. I continued this until all the sheets and the back cover were punched and put the covers and paper together. I started twisting the coil in by inserting one end into the first hole and started twisting the coil, guiding the end of the coil into each hole until I reached the end. I used the pliers to bend both ends inward about 1/4".

What I would do differently: I thought this was a cute little project that kids could do easily. They could use yarn or ribbon to tie it together, but this wire seems o.k. for kids to use since it is coated in plastic...unless you cut it, then it will have sharp edges and need to be filed down. Another idea would be to reuse the coil from a used notebook.

01/15/2012 - Hanbok Coin Purse


You are most likely thinking "what is a hanbok?" A hanbok is a traditional Korean dress usually made from silky material. My mother gave me about five of these dresses that were torn or stained and could no longer be worn or repaired. Super awesome score because there are some gorgeous patterns.

Recycled Material: hanbok dress fabric
Other Material: 4" zipper, matching thread 
Tools: sewing machine, scissors, tape measure

How I did it: I measured and cut 2 pieces of the fabric to the size of 4"x5" and a strip 1"x2.5" for the little handle. Because of the small size, I think it is easier to sew in the zipper first so you can lay the fabric flat. I folded the top of the right side of the fabric over .5" on both pieces of the body of the purse (trying to remember my sewing terms, but I believe the side you want to see is called the right side and the back is called the wrong side) then pinned the zipper. I used the sewing machine with a zipper foot to stitch both sides to the zipper. Next I folded the the piece over with the right sides facing each other and the zipper at the fold to sew the main part of the purse. I went back to a regular presser foot and stitched the three remaining edges, leaving a .5" edge. I added a zig zag stitch around these edges then trimmed them down. I then took the 1"x2.5" strip and folded it in half lengthwise with the wrong side facing out and did a simple straight stitch leaving a little less than .5" edge. I turned the strip inside out and folded it in half to make the little handle. The handle was stitched on the zipper pull side (the side the pull is on when it is closed). I made sure that I stitched over the zipper stitch that was already there then trimmed off the excess. The last thing I did was turn the purse inside out and had an elegant little coin purse.

What I would do differently: This is a simple pattern that can be made from about any fabric. I will probably make the handle width a little thicker so it will be easier to turn inside out. I think I have an old key ring somewhere I can attach to the little handle too. 

01/14/2012 - Pop Tab Stretchy Bracelet

Again, I am going to toot my own horn about my pop tab prowess...after working with thousands and thousands of these things, I have figured out a few tips that will make working with them much easier.

1. Make sure you wash them. If you have a large quantity, just throw them in a bucket of soapy water, rinse and spread out on a towel to dry.
2. If you are taking them off the can, push the tab back and forth so there is a clean break from the piece that attaches it to the can. Trust me, this will save you time later and you won't have to remove these pieces.
3. If you have tabs that were pulled from the can and have either the whole piece of the can connector (this piece is usually square with a circle punched in it) or sharp edges from the connector, they need to be removed. This can be done with a pair of clippers or pliers by either snipping of the piece or using the pliers to bend the connector piece back and forth to make a clean(ish) break.
4. The bottom part of the back side of tab my still have sharp edges. You can try flattening it with pliers - but this could leave marks on the front of the tab. Whenever possible make sure the back of the bottom part of the tab is covered with something (ribbon, cloth, another tab with the back sides facing) if you are going to wear the piece you are making from the tabs.

Recycled Material: aluminum pop tabs 
Other Material: beads, clear stretchy jewelry cord
Tools: scissors

How I did it: This bracelet has 24 pop tabs so I made sure that they were prepared as recommended above. I took two tabs and placed the with the back sides facing together and looped the stretchy cord a couple times and tied a knot on the left side of the bottom hole of the tabs to hold it in place. This is the first time I have used this stretchy cord and I think it is absolutely annoying. The wraps holding the tabs together kept coming loose and the tabs would get all mixed up on a string on clear cord. I have made this style bracelet many times, but always used ribbon until now. After the cord was secure I suspended a bead on the cord in the middle of the bottom hole then wrapped the cord around the right side of the bottom tab a couple times then tied a knot. I found that if you stretch this cord as you are knotting it, it will hold much better. The next thing that I did was to get two new tabs and repeat the process. The only difference is that I did wrap the cord around the left side of the bottom hole of 2nd set of tabs, but didn't knot it. I pulled the cord so that both sets of tabs were flush then wrapped the cord twice around the bottom right side of the first set and bottom left of the second. Since the tabs kept getting loose because the top was not yet secured, I used a couple clothespins to hold them together. I repeated the steps of suspending the bead and wrapping the cord. I did this for 12 sets then tied off the end, but did not close the bracelet at that time. You don't have to use 12 sets of pop tabs, you can make it as big or small as you need it. If I am making something for myself, I always try to put is on as I go along to get an idea of size....measuring is an ever smarter idea. I repeated the entire process for the top set of holes on the pop tabs. The last thing I did was tied the two ends together - top hole to top hole, bottom hole to bottom hole. I was paranoid about the cord coming loose so I must tied about six knots on both the top and bottom then trimmed the excess cord.

What I would do differently: I need to look up tips on working with this stretchy cord because there must be a smarter way to use it. I do like the stretchiness of the cord (obviously) and its transparency. In the future, I will probably weave a ribbon through the top while I am securing the bottom or vice versa to hold it in place. It also looks like I have an obsession with red beads...so I need to diversify.

01/13/2012 - Rubber/Toy Wire Ring


I was still on my toy wire kick when I made this. I found a few pieces that I had saved that had a 2.5" plastic cover over it made me think of a ring...which led to the creation of this little guy.

Recycled Material: toy wire, small piece of rubber inner tube
Other Material: small beads, jewelry wire 
Tools: long nosed pliers, flower craft punch, scissors


How I did it: I used a flower-shaped craft punch to make two rubber flower shapes. This only required a couple inches of rubber so I used scraps from another project. If you don't have or want to buy a punch, scissors work just as well. I used the scissors to make a little hole in the center of both flowers to pull the wire through. I twisted two ends of the toy wire where the 2.5" cover met. This project would work just as well if you have toy wire without this random cover, just twist the toy wire where it will fit your finger. I then pulled both ends of the toy wire through the centers of both rubber pieces then gave the wire one more twist and separated the ends like in the picture. I put 4 small beads on a piece of jewelry wire and wrapped the wire so the beads were squared and then wrapped the wire from the bead around the two separated ends of the toy wire. I trimmed down the toy wire because I decided I liked the way the two pieces looked between the rubber and the beads.

What I would do differently: This is a repeat project but I will try some different designs on top next time. I am finding that this toy wire is really versatile, so next time you come across some, save it to use as a twist tie or to meet any of your small wiring needs. I also need to file down the ends of the toy wire pieces on top because the wire is sticking out the plastic a little.

01/12/2012 - Toy Wire/Faux Pearl Bangle Bracelet

If you have a child who has gotten a toy from any major manufacturer, you have most likely gone through the frustration of trying to get the toy out of the excessive over packaging while your child tries to wait as patiently as possible for said toy. I won't go on my tirade about how much wasteful packaging goes into products, but there are some interesting bits that can be reused instead of thrown away. I have been saving the plastic coated wire (I call it toy wire since I have no idea what it is really called) that holds the product to the box for the last few years now. 


Recycled Material: toy wire
Other Material: jewelry wire, faux pearls 
Tools: long nosed pliers

How I did it: This is another project I just started playing around with before I really knew how it was going to end up. The first thing I did was take two pieces of the toy wire (about 12" long) and twisted them into one piece. I repeated the process to make two of the twisty pieces. I stared at the two pieces for a while and remembered a link I checked from Pinterest that had directions for a bracelet that I thought looked neat: http://craftaytaylor.blogspot.com/2010/10/copy-cat.html. The photos gave me inspiration to make a bangle bracelet along those lines, but I may try to make a bracelet like that one another time.

I made a circle big enough to slip over my hand with both of the twisty pieces and connected the ends together. I will say that this was easier said than done. I ended up trimming about 1" off the end of one of the wires on each end of the twisty pieces -- I made sure not to cut the pieces off the same wire. I did this so I could twist the two trimmed ends together to connect it, then did the same thing to the other twisty piece. The next step I took was to string enough of the fake pearls on a piece of wire that was the size of the twisty wire and connected the wire in a circle like the other parts. I had tried wrapping the beads like the CrafTay girl's instructions at first, but it just wouldn't work. I sandwiched the three pieces (twisty wire, fake pearls, twisty wire), held them in place, then began to wrap jewelry wire around all three pieces so the wire laid between each pearl. I finished up the wrapping by wrapping the wire a few times (close together or butted up or whatever the jeweler term is) around and tucked in the end of the wire. 


What I would do differently: I liked using the toy wire, but looking back, it does not contain as much reclaimed material as I wanted and the pearls took over this piece. The good thing is that I still did reuse something that couldn't be recycled.

Wednesday, January 18, 2012

01/11/2012 - Pink Fused Plastic Gift Bag

I got a pink plastic bag from a local cake decorating shop (yes, I forgot my reusable bag) and it seemed wrong not to make it into something else. I have tried unsuccessfully to make fused plastic crafts before so I am happy this finally worked.

Recycled Material: pink plastic bag
Other Material: none 
Tools: iron and board, scissors, tape measure or ruler, scrap cotton or linen, 2" thick box 

How I did it: The first thing I did was flatten the bag (about 18"x24") and trimmed off a long strip from the side 2" thick for the handle. After my iron was hot I laid the remaining part of the bag on the ironing board and covered it with the cloth, then ironed the bag to fuse the sides together. If you try this, make sure you keep the iron moving or you will have a plasticy mess on your hands, not to mention the smell. I ironed the piece for a few seconds then let the plastic rest for a moment before peeling off the cloth. The plastic shrunk about a third of the size and hardened a bit. I think it would have hardened more if I kept ironing, but I didn't want it to be too stiff. It was also puckered and wrinkled, so I will need to keep practicing to figure out other textures. Then I ironed the long strip for the handle to the texture I wanted.

I trimmed the large piece of plastic to 9"x10" then measured and marked 4" in on both ends of the 10" side  and folded them up to be the front and back of the bag. The plastic was surprisingly easy to crease. Next I measured and cut 2" in on each crease then folded the 2" pieces all around then folded the pieces to overlap like a "U" shape looking at it from the side. This is where it got tricky and the 2" thick box came in (I had to cut a small box to use). I put the box inside the bag and butted it up against the 2" side and covered the plastic with the cloth to fuse the flaps together with the iron. I made sure the sides were fused before adding the handle. This part took a longer to fuse because of the thickness and (I am assuming) because the plastic had cooled. I then put the handle inside the bag centered on the 2" piece then fused it with iron the same way and repeated it on the other side.

What I would do differently: I need to spend more time fusing different types of plastic. There really isn't anything I would do differently since it was a simple concept that was a little harder to execute than I expected.

01/10/2012 - Rubber Circle Bracelet

This is one of those projects that just happened. I started cutting out rubber circles with a different project in mind, but it evolved into this bracelet. 

Recycled Material: rubber inner tube
Other Material: jewelry wire, beads

Tools: scissors, 2" round craft punch, long nose pliers


How I did it: As with most of my rubber projects, I cleaned and prepared the inner tube by slicing it open before I started cutting. I used a 2" Fiskars round craft punch to make circles - I made about 14 circles. The inner tube that I used was a tad bit thick so it took a few pressed of the punch and a little bit of pulling the circle out to make it work. I ended up using scissors to cut out the inner circle so the width around was 3/16". I then overlapped the edges of two circles and used the jewelry wire with a faux pearl strung on it to connect them. I tucked the ends of the wire between the two rubber pieces and clamped the wire down with the pliers. I wired 4 circles together like this then connected the first and last circle to make the bracelet. I then repeated this process on a separate bracelet then put one over the other so the edges of two of the circle from the top bracelet were centered over the middle of the circles on the bottom bracelet. I did not attach the two bracelets together because I think it would have made it look to "clunky".

What I would do differently: I am quite pleased with how this turned out so I wouldn't change anything on the structure of the bracelet. I used some cheap pearls left over from a project I did a few years back, so next time I will use a nicer bead. My mother-in-law suggested using silver beads, which I think would look really nice. One thing that I would love to figure out is how to drill holes in bicycle ball bearings to make beads. I asked my hubby, the bike mechanic, if this is possible and he said they are made with stainless steel and would be hard to clamp and to get the drill set to make a hole. I am stubborn though and will probably give it a try anyway...with safety glasses so I don't lose an eye.

Monday, January 16, 2012

01/09/2012 - Rubber Round Braided Bracelet

Round braiding is something I have wanted to figure out for a long time. I have only seen leather given this treatment, but thought rubber would work nicely as well.

Recycled Material: rubber bicycle inner tube
Other Material: none
Tools: scissors, safety pin

How I did it: As just about everyone does now days I turned to the internet on my quest to learn how to make a round braid. I came across some interesting instructions (even some for an adult harness made using round braids - yikes - ok, that was kind of amusing) but the clearest instructions I found were on eHow "How to Round Braid Leather". I cut the inner tube into 4 strips about 1/8" wide and about 18" long (longer than it needed to be) then followed the eHow instructions. The only thing I didn't do from the instructions was clamp it to a bench or table. Yes, I went through my friendship bracelet phase once upon a time so I just used a safety pin and pinned it to the knee of my jeans.

What I would do differently: I did try this with thinner strips originally, but they were square instead of flat so the strips kept twisting when I braided them and it was too small to tell during the braiding process. I am going to try doing this braid using more pieces and also experiment with the widths of the strips. I think it would be fun to see if I could incorporate beads into this too.

01/08/2012 - Aluminum Ring Box

I was inspired to make this by an old (probably at least 40 year old) aluminum cookie tin my grandmother-in-law has.

Recycled Material: aluminum can
Other Material: none
Tools: long nose pliers, scissors and/or knife

How I did it: My aversion to patterns kicked in with this project and I just started cutting. First I made sure the can was rinsed out - nothing worse than a sticky soda can...well, there are worse things, but sticky cans are not any fun. I used a knife to saw the can as close to the top as I could. The first side you cut off is easy because it is still stiff, but once the top is cut off, the can gets flimsy and it is easier to just cut the rest with scissors. I used scissors to cut the aluminum straight down to the bottom the cut the bottom off as close to the edge as I could get. I then had a lovely sheet of aluminum to work with, but I trimmed the edges because they were kind of sharp. WARNING: in case you have not worked with cutting cans before, aluminum can get very sharp when cut and can splinter off and can be worse that wood splinters to get out of your fingers. I then started folding, cutting and tucking where the pieces seemed like they should go.


What I would do differently: Sometimes I can picture how I want something to turn out in my mind and it works out beautifully--this was not one of those times. I like the idea of this project much more than how it actually turned out so I will try it again somewhere along the line, except I will make and use a pattern. Also, I got too aggressive with the pliers when I was turning the edges down causing pieces of the aluminum to break off. While I am on the subject of aluminum and it's apparent daintiness, aluminum does not like hot glue. I have tried it on past projects and it just melts right through aluminum.

01/07/2012 - Cut Aluminum Bracelet

I consider myself to be an expert in matters related to pop tabs (trashy fashions) but this is the first time I have tried changing the tabs themselves.

Recycled Material: aluminum pop tabs
Other Material: beads, jewelry wire, bracelet closure
Tools: long nose pliers

How I did it: I snipped off the bottoms of the pop tabs but left about a and 1/8" overhand to bend over so that it turned the top of the tab into a "D" shape. I cut 14 tabs like this, then paired them up with the flat ends facing and looped jewelry wire around each pair 3 times. I did this somewhat loosely to give it a little movement. After those were done, I connected the pairs with a piece of jewelry wire with a bead on it. I only wrapped the wire around the aluminum tab once and then wrapped it tightly twice so it was tight between the bead and aluminum. Lastly, I added the jewelry closure.

What I would do differently: Next time I cut aluminum, I need to pay better attention to using pliers on them. The aluminum is so soft that the pliers left small marks on the fronts of the tabs. It kind of worked with this bracelet and gave it more character. Also, I just have the closure set to hook onto the last tab piece. Next time or if I feel the need I will add a loop for the closure. It works, but I think it does not look as finished.

01/06/2012 - Still my daughter's birthday cake

Still not a recycled craft. Making cakes are quite a labor of love and take many hours to complete. I stayed up until about 3am working on the cake then I was up again at 7am to put the finishing touches on the cake and make the princess. When my daughter got up I showed her the princess I had modeled and her first question was "where is the prince?" I used marzipan for the first time to make the princess and it was surprisingly easier to use than fondant. If you like decorating your own cakes and haven't tried marzipan...I highly recommend it. I don't think I need to make any cakes for quite a while...so no more recycled craft interruptions.

01/05/2012 - Daughter's Birthday Cake

Okay, so this obviously is not recycled. I do have one exception to my New Year's resolution...when I need to make a cake, I am focusing on that instead of a recycled craft. I usually start baking the cakes two or three days before I start decorating them. I like to use fondant to cover the cakes and that takes a bit of time to prepare and color. My daughter insisted on a "purple princess cake" for her 3rd birthday.

01/04/2012 - Aluminum Tab Ring

These bigger aluminum tabs are from the tops of cat food cans and I thought they would be interesting to use for projects because of the gold-ish color. I ended up using more beads that I intended so it is not as much recycled content as I wanted but I am happy with how it turned out.

Recycled Material: aluminum tabs from cat food cans
Other Material: transparent green beads, jewelry wire
Tools: long nose pliers with clippers

How I did it: The first thing I did with the tabs was to make sure there were no sharp or ragged edges on the part that gets pulled of the can lid. I arranged 5 tabs so that the bottoms overlapped (when working with tabs I refer to the tops as the smooth side that is pulled and the bottoms as the part that is attached to cans) and arranged the tops like flower petals and wrapped copper-colored wire around the 5 bottoms to hold them in place. I used one long piece of wire and then strung (stringed?) 10 beads on the same wire used to hold the tabs in place. Then made a circle with the bead/wire to cover the bottoms of the tabs and wrapped the excess wire every 2 or 3 beads to attach it to the tab bottoms. Next I took another tab and used the pliers to snip off the bottom leaving about 1/8" to bend so that I had an oval and no jagged edges. Then I attached the oval ring on top of the other tabs and the beads, again using the same piece of wire. I ran out of my long piece of wire at this point and used a new piece and strung 5 beads and again circled them to cover the oval ring then pulled the wire down the center and pulled it around on two opposite sides. With the remaining wire I pulled it down the center again and wrapped it around the other pieces of wire to hold it and tucked the end in with the pliers so it wouldn't poke out. For the final step I strung one bead and bent the wire so I could pull the two ends down the center. Then I wrapped one end in a circle three times for the ring base. I used my finger as a guide for sizing. Then I wrapped the two ends between the base and the top, again tucking in the ends.

What I would do differently: First of all, I need to practice my wiring, beading and jewelry making, but overall I am happy with how this turned out.

Thursday, January 12, 2012

01/03/2012 - Plastic Ring Bracelet

If you like Dr. Pepper, you may recognize these rings. I have been saving these rings for while now trying to come up with something fun to do with them. This would probably be a great project for kids, except using ribbon or yarn to connect the rings instead of jewelry wire.
Recycled Material: plastic bottle rings
Other Material: jewelry wire
Tools: long nose pliers with clippers, cuticle clippers, thin barrel (like a pencil)

How I did it: First I prepared the jewelry wire by creating little rings by tightly wrapping the wire around a pencil and created 10 rings (I made a couple extra in case I messed anything up). I slid the wire off and snipped each of the pieces in the same spot with the needle nose pliers. I am a newbie at wire wrapping, but I was told that you open the ring one toward you and one away from you. If you pull it open outwardly it won't ever close back properly.
All of the rings had sharp little notches inside them so I used the cuticle clipper to snip them off...and that really was not fun. If you decide to try this, I highly recommend using plastic rings without the sharp notches. I attached the rings using the wire rings I made. I also clamped done around the wire rings to help make them stronger...also something I had heard.

What I would do differently: Unless I am really bored, I won't use the sharp notched rings again. Milk rings and other plastic rings aren't as aggressive as the Dr. Pepper bottle rings.

01/02/2012 - Coin Purse

Weaving rubber inner tubes is actually more difficult than it looks. I have started larger rubber weaving projects before, but got too frustrated and gave up on them. For my second project, I gave it another go...on a smaller scale. The strips of inner tube slip and don't like to stay flush with the other strips. I think this is because of the thickness. I went to SCRAP PDX last week and found a simple loom that I am going to try weaving rubber and hope it works better than taping pieces to my glass board.

Recycled Material: rubber inner tube
Other Material: heavy tape (I like using electrical tape on rubber) thread, bias tape or something for edging, snap
Tools: scissors, needle and thread or sewing machine

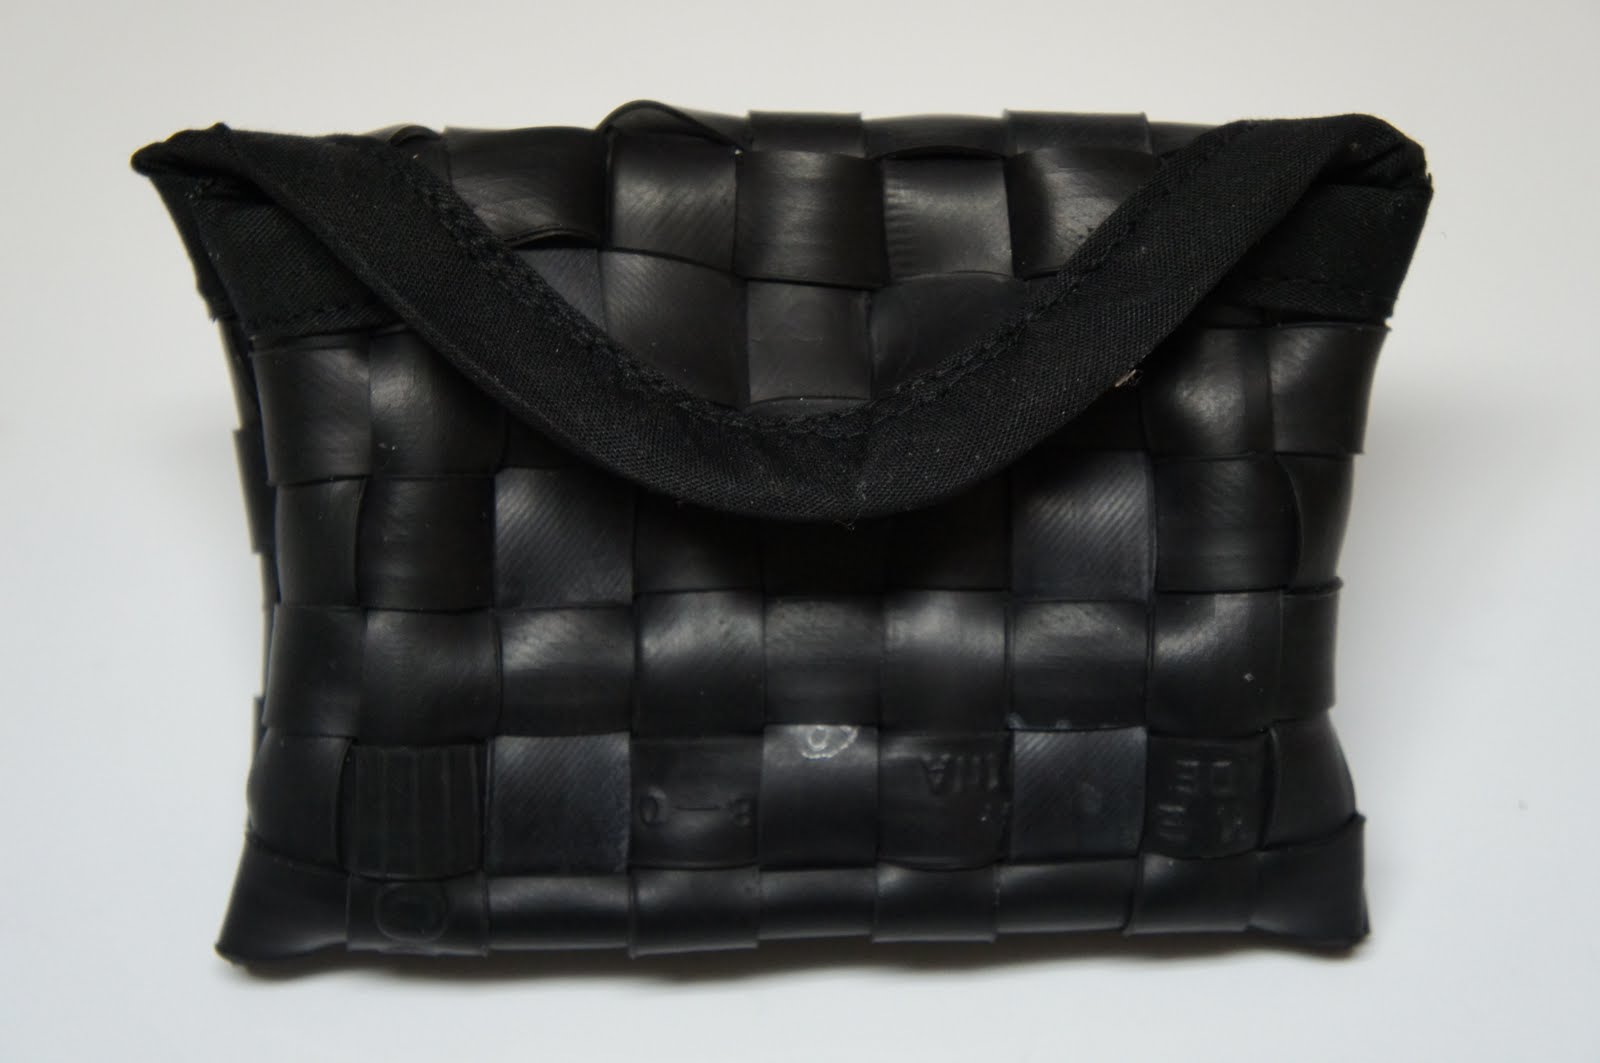
How I did it: I cut inner tubes into strips that are 1/2" wide. Some inner tubes (usually road bike inner tubes) have lines that measure about this width and make cutting a lot less of a headache. I find it easier to cut the length of the tire then cut down the sizes I need. Then I cut 9 of the strips to 10" lengths and 16 strips to 6/5" lengths (this will give you extra room to work and allow about 1/2" edges). The size of the finished product is 3"x4.5". As I said above, I used a glass cutting board, then taped the 9 long strips flush against each other - I only taped along the top and left the bottom loose. Then I took one of the shorter strips and wove it through the longer strips, one over and one under. Make sure the pieces of rubber are all facing the right direction. Then repeated the process for the remaining 15 strips, alternating which one started on top and vice versa. I call this making my "fabric" when working with recycled/discarded materials.

Once the "fabric" was done, I used the electrical tape to measure out the exact size of the purse - 4.5" x 8" but I only taped the bottom and two long sides up to 6". For the remaining 2" I rounded the tape starting at the 6" mark and made the highest point 8". The bottom was folded in half 3" up (inside out) and the remaining rounded 2" was left for the closure flap. I also did a simple stitch to hold the weave together on the short and rounded ends removing the electrical tape as I went along then lined the bias tape on the short ends and used a sewing machine with the tension set to "9" using a leather needle. Once the edges that were going to show were covered, I hand (back) stitched the sides 3" up with the "fabric" inside out on each side using a large needle removing the tape as I stitched (it is a pain in the you-know-what to stitch rubber by itself on my little machine so it was just easier to do it by hand).

Once the coin purse was put together, I turned it inside out then marked the placement of the snap. Originally I used a magnetic closure for it, but it was overkill and just stretched the rubber, so I removed it and used a regular sew-on snap. I hid my stitches behind the weave. I left it sitting out to take a picture of it and my sweet little 88 year-old grandmother-in-law walked up and asked me if I made it for her. How could I say "no"?

What I would do differently: I would probably do a lining because the rubber still stretches a little bit when you pull on the snap, but not as badly as it did with the magnetic closure. Like I mentioned earlier, I am going to see how the loom I got works out, otherwise I am going to have to figure out an easier solution by fashioning something homemade.