Wednesday, February 15, 2012

02/14/2012 - Bicycle Parts Picture Frame

The bicycle chain ring has been sitting in my craft supply pile for many years now. I always thought to myself "that looks so cool, I want to do something really neat with it." I have also been saving some thick clear plastic from the package of a toy my daughter got for Christmas. The frame I got from SCRAP PDX for the wood part so the back was just sitting around. I threw in some rubber, my favorite material of course, and a picture of Zoe and I and had a Valentine's present for my hubby.

Reclaimed Material: bicycle chain ring, inner tube, plastic packaging, back of picture frame
Other/New Material: tops of snaps, photograph
Tools: scissors, hand saw, epoxy, marker, clamp

How I did it: I used the marker to mark the shape of the chain ring on the frame backing (I adjusted the back so that the stand would hold the frame up properly). The frame back was narrower than the width of the ring so it does not cover the whole back. I clamped the frame back to a table and used the hand saw to cut along the marks. I then used that as a guide to cut out the hard plastic to be used as the "glass". I did not have a piece of inner tube wide enough to cover the inner circle in the chain ring so I used the epoxy to glue two pieces together. I used the clear plastic circle as a guide to cut out the picture and rubber then cut a circle in the middle of the rubber so it could be used as the matting for the frame. I glued the picture to the back of the frame, then the rubber. I glued the clear plastic piece onto the back of the chain ring and let the pieces set. I then glued the two pieces together. I used the tops of snaps to fill in the four large holes in the chain ring. 

What I would do differently: My original plan was to use snaps to attach the chain ring to the back of the frame so the picture could be changed, but the snaps were not long enough to be attached to the ring. I would like to figure out a way to make this a frame without having to use the stinky epoxy. It is a necessary evil when working with heavy duty materials.

Tuesday, February 14, 2012

02/13/2012 - Scrappy Valentine's Day Card

Quick little project - my homemade Valentine's Day card for my hubby, awwww, aren't I such a nice wife? This is more scrapbooky than anything else. There are lots of great scrapbooking supplies that people can buy, but you can save a little money by checking your garbage or recycling bin once in a while for supplies. My printer ink was out, so I couldn't use the picture I printed for its original purpose and used it on this card.


Reclaimed Material: cardboard food box, leftover gift bag scraps, misprinted picture
Other/New Material: none
Tools: glue, scissors, markers

How I did it: I don't think this really requires and explanation but I cut out the box to the card size and glued the picture and hearts cut out from the gift bag to the front. I colored the back panel with a marker and glued a few hearts on the back. I used one of the ribbon handles from the bag to wrap around the fold. 

What I would do differently: I could have gone fancier with the card, but wanted to use up some scrap pieces.

02/12/2012 - Packing Peanut/Coffee Bag Earrings

Sometimes you have to make lemonade. I thought for sure melting packing peanuts would mold them together to make a large piece. My original plan was to melt the peanuts together and make a box. They just shrink up into tiny pieces and don't stick to each other...they do, however, get an iridescent look to them when they are melted. I decided to try to make some kind of small jewelry with the pieces, but the pieces were to brittle to use on their own, hence the addition of plastic/foil coffee bag.

Reclaimed Material: packing peanuts, coffee bag, bicycle brake wire 
Other/New Material: earring findings
Tools: iron and board, parchment paper, pliers, glue, straight pin

How I did it: As I stated above, I melted the packing peanuts. I did as with the other plastic melting projects -- between parchment paper with a hot iron. I glued the melted peanuts with the shiny side up onto a coffee bag, also with the shiny side out. Once they dried I cut out squarish pieces from the coffee bag then poked a hole in each piece with the pin near the top to string the wire through. I cut four pieces of the wire (about 4" long each) and looped two through the loop on each earring finding. There were four pieces of wire hanging down so I threaded packing peanut/coffee bag pieces on each strand of wire. I staggered the placement of the squares then wrapped the ends and trimmed the excess wire.
 
What I would do differently: I have no clue what else I would do with these melted packing peanut thingies again. As far as jewelry making goes, I just need to keep practicing on my wire work.

Sunday, February 12, 2012

02/11/2012 - Tree Pendant

I really love working with metal bicycle parts and I have been trying to come up with ways to use them without any welding knowledge. I am not sure how I am going to end up using this piece, but I am happy with how the front turned out!

Reclaimed Material: bicycle cog, bicycle brake wire 
Other/New Material: none
Tools: heavy duty metal snipper, pliers

How I did it: The first thing I did was to thread the brake wire through 4 holes on one side of the cog. I only used two pieces of wire so I threaded each wire in a U-shape between two holes. Brake wire is made up of many little wires, and those little buggers are very sharp. I got a few metal splinters when I was digging through the box at the bike shop I got them from. I used the pliers to untwist each of the wires that make up the brake line to separate them. This was a little more difficult than I anticipated. Once all of the tiny wires were separated I bunched them together and twisted them together at the base as tightly as I could with the pliers to make the "trunk" of the tree. I then grouped smaller sections of the wire to make the "branches" and pulled the ends of the wire through the holes along the top of the cog. After the tree design was complete I twisted the wire together in a circle behind the metal part of the cog to make sure no sharp wires were sticking out.
 
What I would do differently: The only thing I am not completely satisfied with is the back of the pendant with the wires leftover from tree. I need to figure out a good way to hold the wires so that this can be used as a pendant. For now I think I will make a small frame to mount this on.

02/10/2012 - A Different Rubber Headband

This headband is for a friend's daughter, so I hope she likes pink! It is pretty much like the rubber headband I did a few days before with a few changes. 

Reclaimed Material: rubber inner tube, buttons
Other/New Material: decorative eyelet
Tools: scissors, needle, thread, tape, paper, Crop-A-Dile

How I did it: I followed the same steps I did for the headband I made from February 3, but made the center flower a little smaller and added a flower on either side of the larger one. Instead of using a button, I used a decorative eyelet I bought a long time ago. I thought it would be perfect to try and I am happy that it fit to hold the rubber pieces together. I used the Crop-A-Dile to attach the eyelet in the middle flower then found coordinating buttons for the smaller flowers.

What I would do differently: I ended up braiding the band again because it does stretch out and hold nicely. I think I am going to make some of these for my Etsy shop because I now have other design ideas floating around in my head.

Friday, February 10, 2012

Portland Bike Lane


I made this inner tube canvas a while back and I got inspired to work on this piece. I have been wanting to do a "road" picture on the tires of a bike lane because it seemed fitting with the inner tube. The frame is also a scrapped frame.

Available on Etsy: http://www.etsy.com/listing/92729563/portland-bike-lane

02/09/2012 - Inner Tube Basket

Success! It makes me so happy when things turn out the way I picture them in my head!

I would love nothing more than to regale you with tales of my great carpentry prowess, but carpenters and handymen everywhere would cringe at my methods. Let's just say I managed to build a wooden frame for the basket and it is sturdy. I went to the lumber store and the guy looked at me like I grew a second head when I told him what I was working on. He recommended 3/4" x 3/4" wood, but I should have stuck with my guy feeling and gone with something thicker. Also, my "cross that bridge when I get to it" attitude I take with crafting does not translate well into carpentry!

Reclaimed Material: rubber inner tubes
Other/New Material: wood, screws, nails
Tools: saw, ruler, pencil, hammer, sand paper, wood glue, staple gun

How I did it: I won't bore you with my unconventional frame building methods, just the weaving part.I tried to use the same size inner tubes for the weaving (a thin road bike inner tube) but ran out of the really thin ones so the inner tubes on the long side of the basket are a little thicker. I used the staple gun to attach one end of the inner tube one of the short wood pieces on the frame and wrapped it around the "box" horizontally until it met the end I started with. I made sure the piece was taut and stapled it in place over the the other staple. I continued this, butting each piece as close together as possible until I reached the bottom. Next I stapled strips of the inner tube along the top edge of one of the long sides of the frame, again butting them against each other. I then began to weave these strips through the horizontal strips I started with, pulled the strips across the bottom then wove the strips up the other side so it covered 3 sides. I made sure the pieces were taut and stapled them on the other top edge. I repeated this on the short sides, except wove the inner tube through the bottom strips from the long sides. I cut strips of rubber to cover the edges and the staples that were on the outside of the box. 

What I would do differently: I am still trying to figure out the best option for a handle, but I am more than satisfied with the result.

Thursday, February 9, 2012

02/08/2012 - Metal Box Frame

I am trying to make a rubber inner tube basket for a project my sister-in-law is working on, so this was my first attempt at making the frame for it. It isn't necessarily a failure, but not a success in regards to what I am trying to accomplish. My original thought was to use wood but found metal pieces at SCRAP that I thought would work. I am proud of myself for getting this far with metal without having the appropriate metal working tools, but maybe someday I will be an expert welder/metal fabricator.

Reclaimed Material: aluminum pieces from SCRAP, screws, nuts
Other/New Material: none
Tools: metal snippers, ruler, marker, screwdriver, pliers

How I did it: The dimensions of the basket are 14"x11"x7" so I measured and marked 4 of each size. The metal pieces were 15" long each so for the 14" pieces I measured .5" from each end and the metal was pliable enough to bend those pieces at the marks. I measured the smaller pieces so that the holes that were already drilled (the pieces looked like they were part of a filing cabinet) lined up when I put them together. I was able to use metal snippers to cut the metal down to the other sizes I needed. I used a screw and nut (they were in a little cabinet I got from a garage sale) in each corner to secure it.


What I would do differently: I tried multiple ways to attach the rubber inner tubes to the metal but to no avail. I went to the fabric store and found rivets, but didn't look at the price closely and thought they were $2.99 for a pack of 24, but they were $8.99 -- I am too much of a cheapskate to spend that much money. I tried a couple other things too, but as you can see by the picture, nothing worked. I think I can use this frame for another material I come across for a later project.

02/07/2012 - Zipper Pull Jewelry

One thing I am going to miss being away from Chicago is Swap-O-Rama-Rama (if it is still going on) because of their great motto "creators not consumers". It is so easy to discard things once they are broken or we are tired of them. The zipper pull broke off my Timberland fleece (not that I would discard it), so I decided I would give it a little pizazz by making my own zipper pull. Plus Zoe noticed the pull was missing and she cutely noticed the new one I made.

Reclaimed Material: random metal bits, broken bracelet
Other/New Material: jewelry wire
Tools: pliers, pencil

How I did it: I chose the random bits of metal that I wanted to use - a little key, a metal oval from a piece of clothing, a zipper pull from a scrapped sweater, and little baubles from a broken bracelet. I wrapped the jewelry wire around the pencil twice to make the ring to put the items on and attach it to the zipper. I used the pliers to tamp down the ring to make it stronger (and also snip the wire) after I put it on the zipper.

What I would do differently: Not much to do differently with this except use different pieces. I was going to add a few more bits, but it seemed like overkill for a fleece.

02/06/2012 - Cashmere Wrist Warmers

My mother-in-law is a fabulous crafter and let me go through some of her scraps for something I wanted to make for my niece for Christmas. Christmas came and went and I never got around to making these wrist warmers for my niece so I took the opportunity to make them as part of my New Year's challenge. They are really cozy though so maybe I will have to keep these for myself, tee hee hee.

Reclaimed Material: cashmere sweater scraps
Other/New Material: embroidery thread
Tools: scissors, needle

How I did it: I cut the scraps so the finished edges that were left would be the tops of the warmers and the top of the warmers each had a star on it. I made a simple pattern that measured about 5"x7" (there is a rudimentary pattern below if anyone wants to try this easy project). There were 4 pieces (2 for the left and 2 for the right. I put the wrong sides together and used the embroidery thread to sew the pieces together using a blanket stitch. After the pieces were sewn together, I sewed an "X" one inch inside the top right side of the left warmer and one inch inside the top left side of the right warmer.

What I would do differently: This project would have been much faster if I machine stitched them, but a) sitting and hand sewing is relaxing to me and b) I only finished one warmer on the 6th and finally finished the second one on the 8th. I will try this again with tops that fold over to make them mittens.

Monday, February 6, 2012

02/05/2012 - V-Day Garland


Since I have a little one now, I am trying to do a better job of decorating for the season/holiday, but I am also a cheapskate so I don't want to spend money doing so. My little Zoe got a sweet Valentine's package from some wonderful friends in Chicago and a 3 year old + gift bag = torn/crumpled gift bag that can't be reused. Most gift bags are paper covered in a plastic film, so they can't be recycled once they cannot be reused. 

Reclaimed Material: discarded gift bag, plastic grocery bag
Other/New Material: none 
Tools: scissors, hole punch

How I did it: The gift bag was covered in hearts so I just cut them out and was happy not to have to make a template. After I cut out the hearts I punched a hole on either side of each heart. I then cut off the handles of the plastic bag so the top was even, then began to cut the bag into a 1" strip around. I cut the bag kind of like an apple peel so I could have one long piece for the garland. I then strung the plastic "string" through the holes on each side of the hearts so that the long part of the "string" was behind the hearts. I tied loops on both ends of the garland and trimmed off the excess plastic "string" then hung it up. When Zoe got up in the morning she said "Mom, we have Valentine's decorations!"

What I would do differently: I saved the scraps from the bag that I cut the hearts out of, so I will end up using them for some other craft to celebrate this month-o-love.

02/04/2012 - Pull Tab Cuff

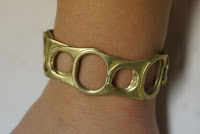
I was determined to make this bracelet work. I wouldn't call this exactly a successful project, but it is the general idea of what I wanted to accomplish. From what I understand, aluminum cannot be soldered and I believe welding a small aluminum tab would just melt it, so I am on a quest to find a way to hold these pieces together and super glue was just my temporary solution.

Reclaimed Material: aluminum pull tab
Other/New Material: none 
Tools: super glue, (2) pliers, patience

How I did it: I took 8 pull tabs from cat food cans and made sure they were clean and bend down the jagged part on the bottom hole. I began by overlapping two tabs with the bottom overlapping, using super glue in between the tabs, then overlapping the top over a new tab, super gluing, etc. After the super glue set, I put the strip of tabs over my wrist to determine where to bend it to fit. I clamped a pair of pliers on one side of the hole where I wanted to bend the piece and the second pair of pliers on the other side of the hole and slowly bent the aluminum and continued this in the sections needed to fit my wrist. To be quite honest, I was very impatient with this and did not give the super glue enough to fully set and the tabs popped away from each other when I first started bending them by hand.
 
What I would do differently: I am determined to find a solution to melting this tabs together other than using caustic glue which really is not a great solution because it can break apart. Using the pliers scuffed up the aluminum, which could be good if I want a weathered look.

02/03/2012 - Rubber Headband

I get headaches from regular headbands and fabric headbands always slide off my head, so I have never had a good headband option...until now. The rubber makes a great headband because it stays in place and has enough elasticity to stay in place without squeezing my head or slipping off.


Reclaimed Material: rubber inner tube, button
Other/New Material: none 
Tools: scissors, needle, thread, tape, paper

How I did it: I used three strips of inner tube a little bit wider than 1/4" and 25" long each. I wrapped a small piece of tape around the three pieces on one end then did a regular braid and taped off the end. I fit the band to my head and stitched the ends that were overlapping. I wrapped an extra strip of rubber around the overlapping ends to cover them and did a small stitch to hold the cover in place. For the flower, I cut out my pattern on the paper then cut out two flowers using a wide piece of inner tube. Both flowers were sewn onto the headband then I found a coordinating button from my random box of buttons that everyone seems to have and sewed it on top of the flowers.

What I would do differently: Braiding the band looked nice, but the rubber strips kept twisting and the band curls up. I think doing a round braid or just using wider strips would work just as well.

Friday, February 3, 2012

02/02/2012 - Bubble Wrap Checkbook Cover


I received two packages today that had silvery bubble wrap in it (that isn't all I received). I really liked the color so continued on the streak of melting plastic. Packing material is always a pain because there are not many recycling markets available for it. Usually you can take it to a shipping store, like UPS, and they will take it back for reuse if you don't have a crafty project in mind for the stuff.

Reclaimed Material: bubble wrap, clip on earring
Other/New Material: none
Tools: scissors, iron, ironing board, parchment paper, ruler, super glue

How I did it: This time I used parchment paper instead of cloth as the barrier between the iron and plastic and it worked out wonderfully. I didn't pop the bubbles in the wrap before because I wanted to see what would happen when I pressed the hot iron on it. When the bubbles melted they made a neat circle pattern in the melted plastic. I folded the piece of bubble wrap in half then melted it completely with the iron. I have found that if you over iron the plastic it gets a curdled look to it. I repeated the process with another sheet of bubble wrap then pressed the two melted pieces together. I then cut the piece down to 6.5"x9" and as you can see by the photo scalloped the edge that was going to be on top. I folded the plastic down to 3.5" with the bottom portion to be used between carbon sheets and the top as the cover. I then took one of the 6.5" long scraps I had trimmed off then folded it in half to about .5" and pressed it with the hot iron. I placed it lengthwise near the top of the middle section of the folded plastic piece melted the ends about .25" in to adhere it to the large plastic piece. This piece is to slide the back of the check book into. I also gently ironed the trimmed edges of the plastic to make sure that the pieces were fully melted together. The plastic was thick and the folds kept coming up so I put the parchment paper between the pieces and gently pressed the iron on the folds to hold them in place.

I removed the earring clip from the back of the earring (I was able to do this by hand by pulling it). I used super glue to press it to the front cover, but also pressed the plastic behind it with the iron to shape the decoration around the plastic.

What I would do differently: After I put the sparkle on the cover of the piece, I decided this might might make a fun clutch purse for another project. I think I am going to experiment sometime with grrrr...packing peanuts too.

Thursday, February 2, 2012

02/01/2012 - CD Cover Wallet

February is here and I have one month down of my New Year's Resolution! Hooray! This is a project I have been meaning to do for a long time. CD covers have the coolest artwork and when we consolidated our CD collection a few years back I save all the covers and neat artwork and gave away the cases (but now regret that :). I tried experimenting with fusing newspaper bags in the past, but would give up before I let the plastic get hot enough to melt. I had seen an awesome pattern for a fused newspaper bag messenger bag in the, sadly now defunct, Ready Made book which made me want to experiment with it. I am happy this finally worked and this process is pretty much like a homemade laminating machine, so if you want something laminated, this is an easy at home way to do it.

Reclaimed Material: old CD Cover, newspaper bags
Other/New Material: bias tape
Tools: scissors, iron, ironing board, sewing machine, thread, measuring tape, scrap cloth

How I did it: I sandwiched the CD cover inside the newspaper bag and then covered both sides with the cloth and used the iron to melt the plastic. I melted three layers on both sides of the cover, then repeated these steps on two more sheets that were included with the CD. I cut the outside of the wallet to 8.5"x3.5", then cut the next sheet to 3" and the last sheet to 2.5" using the same width of 8.5". I sewed the bias tape along the top edges of each of the these sheets, then stitched a little center left on the two shorter sheets to make little pockets. I made sure the pieces were flush along the bottom then wrapped the bias tape around the three remaining edges. I folded the piece in half and ended up with a rockin' wallet.


What I would do differently: Next time I will use parchment paper to melt the plastic bags to the paper. Also, I am going to use a thinner bias tape.

Wednesday, February 1, 2012

01/31/2012 - SCRAP Name Badge

I signed up to volunteer at one of my favorite Portland places, SCRAP PDX and was given a plastic sleeve filled with all kinds of goodies to create my volunteer name badge. I love the idea of having the volunteers make their own name badges using random scraps of paper and bits.

Reclaimed Material: paper scraps, name badge holder, lanyard, aluminum flowers left over from the hair pin project, metal clip from a coffee bag
Other/New Material: none
Tools: scissors, glue stick, glue dots, super glue, markers, rubber stamps (included in SCRAP pack), stamp pads

How I did it: The pack that I picked out to make my name badge contained a badge holder and lanyard; magazine picture of a wood carving of a woman; photo copy of a turn of the 19th century advertisement; a card that someone else had decorated with green hearts, gold foil and drew on; metallic card with flowery design and hold punched in it; camel colored and maroon colored paint samples; large greenish-brown card stock; fancy green paper; "z" stamper; "f" stamper; and plastic white dove. I felt the need to list it all out because I love the awesome randomness that somehow all flowed together. I used the "f" stamper to make a template for name on the red and cut it out. The rest is just random designs and additions and there isn't much to explain.
 
What I would do differently: This project is one that depends on the creative mood -- it could be completely different if I did it a month from now. I am not sure if I like how the letters I cut out in red look with the black outline, but that would be a minor change. I think this is a fabulous idea for any reuse/recycling organization, or any group for that matter, to use up office scraps for meetings and conferences.

01/30/2012 - Cardboard Tube Owl

Whooo" loves this project? I do! The flu bug has stricken my household and this was all the energy I could summon to fulfill my New Year's Resolution. This was a great pin I found on Pinterest, http://pinterest.com/pin/181621797442261216/. Not sure if that link will work, but here are some similar instructions: http://www.frugalfamilyfunblog.com/2010/10/owl-family-play-set.html. 
Reclaimed Material: toilet paper roll, fabric scraps, map 
Other/New Material: googly eyes 
Tools: glue, tape, scissors

How I did it: The first thing I did was cut the map (that came with junk mail) to fit around the roll and glued it to the roll. I focused the map on my new home state of Oregon. I folded down the top of the tube to make the owl's ears and taped it down. The scraps I used for the wings and beak are from a Christmas fleece project and are green and yellow in honor of my hubby's Oregon Ducks. I cut and glued the scraps on and added the googly eyes.

What I would do differently: Next time I will include my daughter on this owl-rific adventure...once the flu bug has left the premises. I just covered the roll, but will paint it next time. I also saw a cute little picture of this project where both ends were folded down to make a little gift box. Too cute.

01/29/2012 - Contact Lens Case Locket

This is my "gift with purchase" project. I seem to have an abundance of contact lens cases that come with contact lens solution and the necklace and charm on the front of the case were "free" gifts my grandmother-in-law received for donating to various causes. She gave them to me because she would have discarded them otherwise. This is fun "locket" and can be used to keep anything from medication to even an extra contact lens.

Reclaimed Material: contact lens case, necklace, charm, wine bottle foil
Other/New Material: none
Tools: metallic paint, box knife, Dremel tool, super glue, drill


How I did it: This project required more heavy duty tool work than my other projects. The first thing I did was take the lids off the contact lens case and used the box knife to cut it in half. Not to state the obvious, but if you try this, please use caution when using any sharp objects. I made sure not to cut too close to the side I was using so that I had enough of a lip to drill a hole to hang the necklace on. I used the Dremel to sand down the sides to make the edges smooth, trying to keep the lip I cut even with the rest, other than the section that I was going to drill. I lightly sanded the back of the case so the paint would stick to the plastic. Once the edges were sanded, I used a tiny (1/16" ?) drill bit to make a hole for the finding (I believe that is the correct term for the little loop that connects the charm to the necklace). Next, I used a silver metallic paint and painted the base of the lens case and the lid. I tried not to get paint on the area where the lid screwed onto the base. After the paint dried, I glued the foil circle from the top of a wine bottle to the lid and then glued the charm on top of the foil. The charm had a little piece sticking off the top to hang it from a necklace, so I was able to easily bend it off with pliers and used the Dremel to smooth the edge. I then used one of the findings from another discarded charm and inserted it into the hole that I drilled in the lens case. I then threaded the necklace chain through the finding and viola, had a lovely waterproof locket. 
 
What I would do differently: If I make this again, I would use a different metallic paint. I think spray paint would look nicer than the paint I used. I also don't think it was really to sand the plastic since it won't be getting heavy duty use and the back looks like it was sanded.