Showing posts with label inner tube. Show all posts

Friday, April 13, 2012

04/10/2012 - Copper and Rubber Wristband

For Christmas I made various handbags as gifts for people, including one with rubber inner tubes. I thought I had measured the purse handle length incorrectly and trimmed off the excess...only to find out it was too short. To make my long story even longer, I had a leftover bit of rubber with fabric stitched to it. I need to make a longer purse handle, so I will have more pieces like this if I want to make more. I do like this wristband a lot and have been wearing it all day.

Reclaimed Material: scrap rubber/fabric piece, button, copper wire
Other Material: none
Tools: scissors, needle, thread, pliers

How I did it: I threaded the copper wire through a large-eyed needle and used it to whip stitch the unfinished ends of the rubber on both ends. I flattened the wire by tamping it down with the pliers. I placed the button and sewed it onto the rubber then cut a slip for the button hole that corresponded with the button placement. I used black thread to cover the button hole.

What I would do differently: I could have done the button hole stitching with a sewing machine, but by the time I got the right tension, etc. it was just easier to stitch it by hand. Also, the copper whip stitches could have been a little bit neater, but it is an effect I want to keep practicing.

Monday, April 2, 2012

03/28/2012 - Brake Wire Tree

Trees are some of my favorite things. They are beautiful, unique--I can go on and on and on. I was so excited to start the tree once I finished the canvas. I was a little worried this wasn't going to turn out the way I wanted it to when I started the trunk, but as I kept going it came together nicely.

Reclaimed Material: bicycle brake wire
Other/New Material: electrical tape
Tools: brake wire cutters

How I did it: After I washed the wire/cables, I started with the trunk of the tree by using pieces of brake wire that had cable stops on the bottoms, yes, I was just told by my hubby that is the correct name. I threaded the wire through the weaves and twisted them randomly to give it more of a trunk look. I unraveled a strand of the brake wire and used it to hold the trunk in place by looping the strand around from underneath. After the trunk was completed, I spread out the brake wire to make the branches. I unraveled the ends of the brake wire branches to make smaller branches then tucked the ends between the weaves of the canvas.

What I would do differently: I need to be more careful with the brake wire because I got a lot of little cuts. I also scrubbed them before I started this project but there was grease in the nooks and crannies of the wires, so I think I should soak them overnight in Simple Green.

03/27/2012 - Finishing up Rubber Frame

This frame took much longer than I anticipated it to. I was working on it in the middle of the family room floor and I think every family member, even the dog managed to walk on it while I was sitting there.

Reclaimed Material: rubber inner tubes, wooden frame
Other/New Material: staples
Tools: scissors, staple gun

How I did it: I finished weaving the horizontal strips through the vertical, pulled them taut and stapled them to the other side. Because the strips were so thin I had to continuously straighten them out as I went along.

What I would do differently: Next time I do a frame this large, I definitely need to use larger strips (I think I said that already), but it really paid off because the weave looks really nice.

03/23/2012 - Last of the Basket Weaving

Holy moly! I did it! 12 baskets done, well, mostly done at that point. The project left my hands in need of some tlc and a good scrubbing. It felt good to have the bulk of the project done.

Reclaimed Material: rubber inner tubes
Other/New Material: staples 
Tools: hammer, staple gun, scissors

How I did it: See: original rubber basket project. 

What I would do differently: Moisturize my hands better during the process.

03/22/2012 - Baskets - there is an end in sight!

I had to do an inner tube run to my hubby's work to raid their tire/inner tube recycling bins. Apparently I have competition in raiding those bins, but there is plenty to go around and the artists who are also raiding the bins do awesome work - one makes belts and the other makes die cut bracelets. These tubes are really dirty though and filled with talc, so almost a week and half later I am still trying to get stains off my fingertips.
 
Reclaimed Material: rubber inner tubes
Other/New Material: staples
Tools: hammer, staple gun, scissors

How I did it: See: original rubber basket project. 

What I would do differently: I should have washed the second batch of tubes better.

03/21/2012 - You guessed it, baskets!

Knocked out two more...woot woot. I actually took one to a crafting affair called Makin' It with Destination DIY and got most of it done there. Super fun event with free beer and pizza, who could ask for anything more? I got to chat with some super talented crafters/creators/makers and check out their fabulous creations, all while listening to some groovy tunes. 

Reclaimed Material: rubber inner tubes
Other/New Material: staples
Tools: hammer, staple gun, scissors

How I did it: See: original rubber basket project. 

What I would do differently: Maybe I should have been drinking more beer during this project...I seemed to be really productive at the crafting party!

Sunday, April 1, 2012

03/20/2012 - Finished another basket

I saved all the finish work for these until the end. My biggest goal was to get the weaving done.

Reclaimed Material: rubber inner tubes
Other/New Material: staples 
Tools: hammer, staple gun, scissors

How I did it: See: original rubber basket project. One thing I haven't mentioned yet is that I covered the wood with rubber by stapling rubber pieces I splayed open on the sides of the wood that were going to be covered with the weaving.

What I would do differently: I still need to figure out a frame option that would be easy for me to make myself.

03/18/2012 - More and more baskets

I managed to add 2 more baskets to the grouping. Zoe grew tired of the baskets after me sitting and making 5 of them and came running in with her "magic wand" and said, "Abracadabra make these baskets disappear! Mom, stop working on the baskets! Abracadabra make all this rubber disappear!" Her magic skills need some work because they did not disappear.

Reclaimed Material: rubber inner tubes
Other/New Material: staples 
Tools: hammer, staple gun, scissors

How I did it: Still doing the same thing: rubber basket. 

What I would do differently: Get Zoe some magic lessons.

03/17/2012 - Making progress on the basket project

I didn't make 3 of these in one day, the chronicles of the baskets show them cumulatively.

Reclaimed Material: rubber inner tubes
Other/New Material: staples 
Tools: hammer, staple gun, scissors

How I did it: See: original rubber basket project. 

What I would do differently: Not applicable, or is it?

03/15/2012 - Another Basket

This was the official start of my 12 rubber basket project, so this will be dominating a few posts. I washed about 115 inner tubes in the bath tub and put a swimsuit on Zoe and her stomp on them like grapes to get them clean. Ah, what special mommy/daughter time.

Reclaimed Material: rubber inner tubes
Other/New Material: staples 
Tools: hammer, staple gun, scissors

How I did it: Thankfully I didn't have to build the frames for these baskets or I would probably still be working on them. The frames were built by professionals then I pretty much followed the same thing I did on the original rubber basket project.

What I would do differently: Since the prototype was a success, there is nothing to do differently.

Friday, March 30, 2012

03/09/2012 - Rubber Triangle Bracelet

I wanted to try something funky with a piece of inner tube, but I am not sure this translated well from the mental picture I had of this. This is kind of geometric, 80s-ish. I can't help but think of Jem and the Holograms. Wow, that makes me sou

Reclaimed Material: rubber inner tube
Other/New Material: none
Tools: scissors, X-acto knife 

How I did it: I cut a long triangle from the rubber long enough to fit around my wrist with a little bit of overlap. I cut two vertical slits on the short side of the triangle for the point to fit in.

What I would do differently: I should have cut the triangle longer. The point pulls out of the slits a bit. OK, sorry, that sounds worse than I mean it to, I am now getting my mind out of the gutter. This is really boring and needs some pizazz...glitter? sparkles? diamonds?

Friday, March 16, 2012

02/20/2012 - Rubber/Antique Button Hairband

Yes, another headband...for a friend. I got this done the night before I went out of town so I just took a quick picture.

Reclaimed Material: rubber inner tube, antique(ish) button
Other/New Material: none
Tools: scissors, needle, thread, tape, paper

How I did it: Again, I did the same thing as the other headbands. My grandmother-in-law gave me some of her old sewing stuff and I found the awesome button for the middle of the flower.


What I would do differently: As you can see the flower rolls up on the sides. I found with some of the inner tubes that they roll up depending on how I cut them.

Thursday, March 15, 2012

02/16/2012 - 100% Rubber Coin Purse

I made this cute little guy as a gift for my great aunt-in-law for her 91st birthday. I have to say that she and my grandmother-in-law are the cutest pair of ladies I have ever met. It is wonderful to see two ladies who have lived such full and interesting lives enjoying each others company.

Reclaimed Material: bicycle inner tube,
Other/New Material: none!
Tools: scissors, little bitty hold punch

How I did it: I had a fat inner tube that was rounded so I couldn't use it for my other projects. I sliced the inner part of the tube like a hot dog bun (impressive analogy, I know) for the base of the coin purse. I had to overlap separate pieces on each side to make the purse 3.5" high. I cut the pieces into a trapezoid shape with the top 4.5" wide and the bottom 5" wide. For the flap, I used a piece of the inner tube that had vertical lines on it and cut it to fit the top portion. Next I punched holes closely together around the sides and top, including the flap, and made sure that the holes lined up on each side. I punched the holes farther apart for the horizontal pieces. I cut long strips of rubber (a little skinnier than 1/16") to use as my "thread". I started by straight stitching the panels together for each side, but used the same piece of "thread" for the front and back, then tied the ends in a little bow on the back to give it a little whimsy. I then whip stitched up along one side and the top with the flap. Next I started at the bottom of the remaining side and whip stitched to the top and tied the ends of the "thread" together.

What I would do differently: I wouldn't change anything about this little purse. I love that it is sturdy and made with only rubber. I am also in love with the little bow.

Wednesday, March 14, 2012

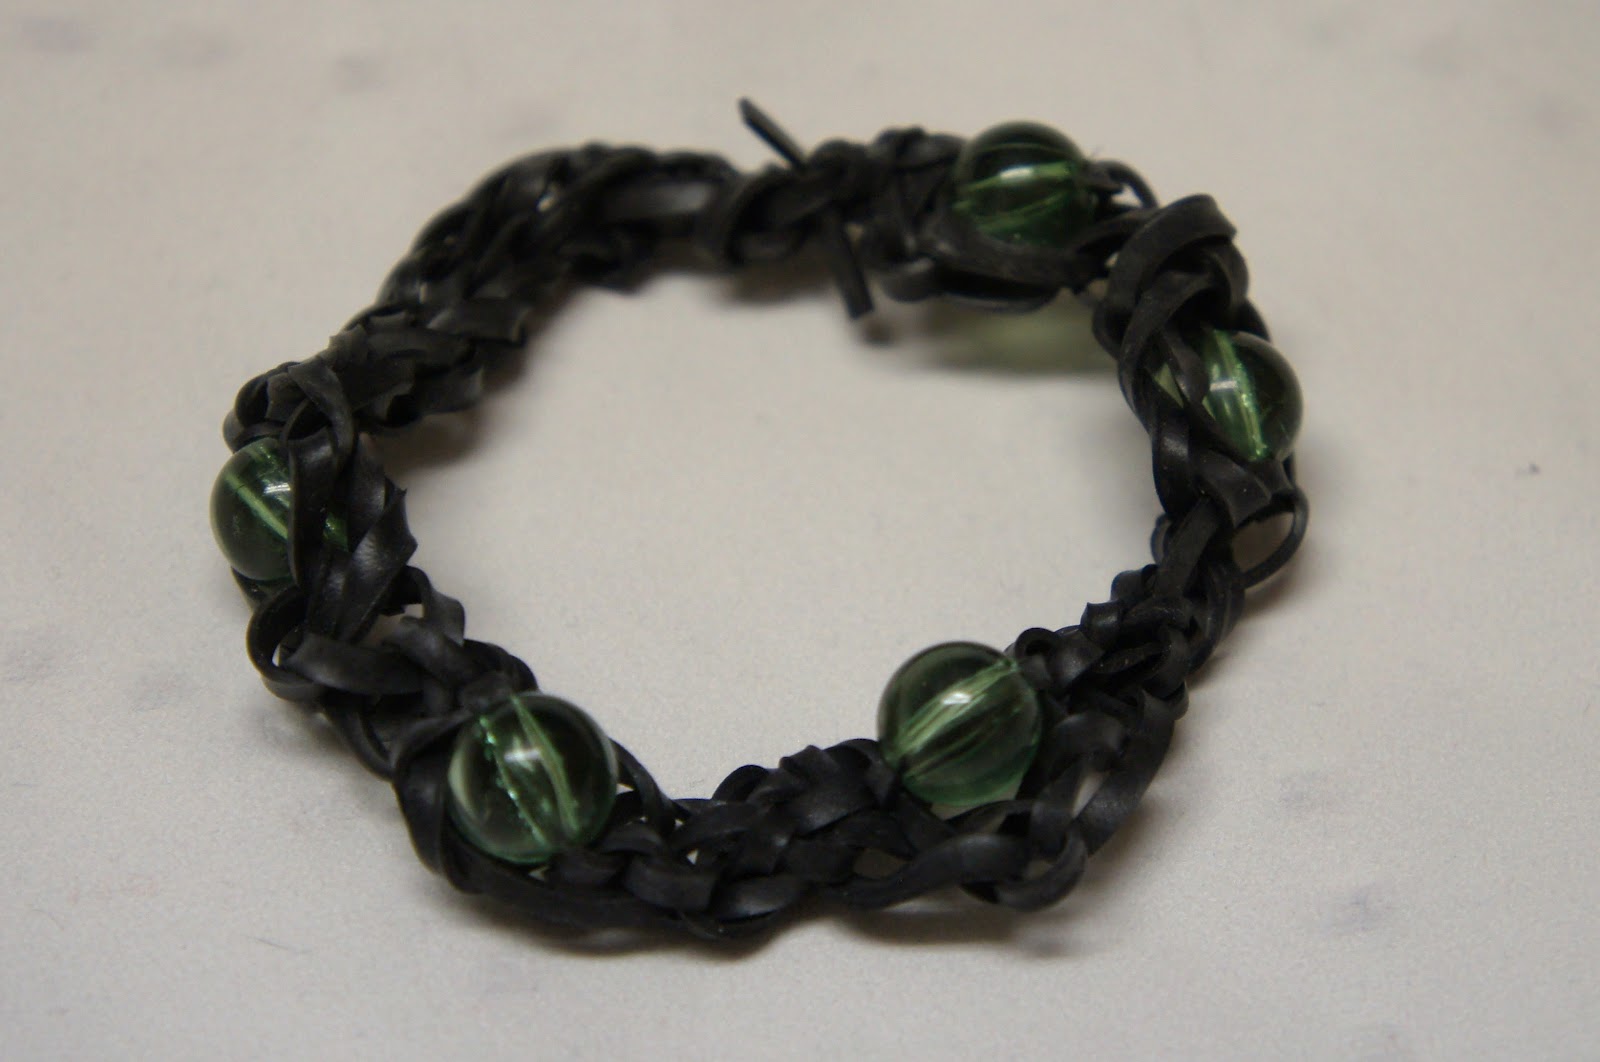
02/15/2012 - Crocheted Rubber Bracelet

Time to catch up on my posts...no more traveling, research papers or sick kids! I had to dust off my crochet skills to do this project. I have never tried a crochet project that required any deviation from the regular crochet, so this may be the fanciest thing I have crocheted.

Reclaimed Material: bicycle inner tube, beads from SCRAP
Other/New Material: none
Tools: scissors, crochet hook (J)

How I did it: I had skinny strips of rubber left over from another project. The strip I used was about 1/16" wide. I began by crocheting a regular chain stitch. I started the next line of crochet and added a bead every 4 hooks. I was going to do one more chain, but decided it didn't need it. Lastly, I tied the ends together.

What I would do differently: I will definitely try this again. Next time I will use a bigger crochet hook. It turned out a little messier than I had intended, but I still like it enough to wear it.

Wednesday, February 15, 2012

02/14/2012 - Bicycle Parts Picture Frame

The bicycle chain ring has been sitting in my craft supply pile for many years now. I always thought to myself "that looks so cool, I want to do something really neat with it." I have also been saving some thick clear plastic from the package of a toy my daughter got for Christmas. The frame I got from SCRAP PDX for the wood part so the back was just sitting around. I threw in some rubber, my favorite material of course, and a picture of Zoe and I and had a Valentine's present for my hubby.

Reclaimed Material: bicycle chain ring, inner tube, plastic packaging, back of picture frame
Other/New Material: tops of snaps, photograph
Tools: scissors, hand saw, epoxy, marker, clamp

How I did it: I used the marker to mark the shape of the chain ring on the frame backing (I adjusted the back so that the stand would hold the frame up properly). The frame back was narrower than the width of the ring so it does not cover the whole back. I clamped the frame back to a table and used the hand saw to cut along the marks. I then used that as a guide to cut out the hard plastic to be used as the "glass". I did not have a piece of inner tube wide enough to cover the inner circle in the chain ring so I used the epoxy to glue two pieces together. I used the clear plastic circle as a guide to cut out the picture and rubber then cut a circle in the middle of the rubber so it could be used as the matting for the frame. I glued the picture to the back of the frame, then the rubber. I glued the clear plastic piece onto the back of the chain ring and let the pieces set. I then glued the two pieces together. I used the tops of snaps to fill in the four large holes in the chain ring. 

What I would do differently: My original plan was to use snaps to attach the chain ring to the back of the frame so the picture could be changed, but the snaps were not long enough to be attached to the ring. I would like to figure out a way to make this a frame without having to use the stinky epoxy. It is a necessary evil when working with heavy duty materials.

Sunday, February 12, 2012

02/10/2012 - A Different Rubber Headband

This headband is for a friend's daughter, so I hope she likes pink! It is pretty much like the rubber headband I did a few days before with a few changes. 

Reclaimed Material: rubber inner tube, buttons
Other/New Material: decorative eyelet
Tools: scissors, needle, thread, tape, paper, Crop-A-Dile

How I did it: I followed the same steps I did for the headband I made from February 3, but made the center flower a little smaller and added a flower on either side of the larger one. Instead of using a button, I used a decorative eyelet I bought a long time ago. I thought it would be perfect to try and I am happy that it fit to hold the rubber pieces together. I used the Crop-A-Dile to attach the eyelet in the middle flower then found coordinating buttons for the smaller flowers.

What I would do differently: I ended up braiding the band again because it does stretch out and hold nicely. I think I am going to make some of these for my Etsy shop because I now have other design ideas floating around in my head.

Friday, February 10, 2012

Portland Bike Lane


I made this inner tube canvas a while back and I got inspired to work on this piece. I have been wanting to do a "road" picture on the tires of a bike lane because it seemed fitting with the inner tube. The frame is also a scrapped frame.

Available on Etsy: http://www.etsy.com/listing/92729563/portland-bike-lane

02/09/2012 - Inner Tube Basket

Success! It makes me so happy when things turn out the way I picture them in my head!

I would love nothing more than to regale you with tales of my great carpentry prowess, but carpenters and handymen everywhere would cringe at my methods. Let's just say I managed to build a wooden frame for the basket and it is sturdy. I went to the lumber store and the guy looked at me like I grew a second head when I told him what I was working on. He recommended 3/4" x 3/4" wood, but I should have stuck with my guy feeling and gone with something thicker. Also, my "cross that bridge when I get to it" attitude I take with crafting does not translate well into carpentry!

Reclaimed Material: rubber inner tubes
Other/New Material: wood, screws, nails
Tools: saw, ruler, pencil, hammer, sand paper, wood glue, staple gun

How I did it: I won't bore you with my unconventional frame building methods, just the weaving part.I tried to use the same size inner tubes for the weaving (a thin road bike inner tube) but ran out of the really thin ones so the inner tubes on the long side of the basket are a little thicker. I used the staple gun to attach one end of the inner tube one of the short wood pieces on the frame and wrapped it around the "box" horizontally until it met the end I started with. I made sure the piece was taut and stapled it in place over the the other staple. I continued this, butting each piece as close together as possible until I reached the bottom. Next I stapled strips of the inner tube along the top edge of one of the long sides of the frame, again butting them against each other. I then began to weave these strips through the horizontal strips I started with, pulled the strips across the bottom then wove the strips up the other side so it covered 3 sides. I made sure the pieces were taut and stapled them on the other top edge. I repeated this on the short sides, except wove the inner tube through the bottom strips from the long sides. I cut strips of rubber to cover the edges and the staples that were on the outside of the box. 

What I would do differently: I am still trying to figure out the best option for a handle, but I am more than satisfied with the result.

Monday, February 6, 2012

02/03/2012 - Rubber Headband

I get headaches from regular headbands and fabric headbands always slide off my head, so I have never had a good headband option...until now. The rubber makes a great headband because it stays in place and has enough elasticity to stay in place without squeezing my head or slipping off.


Reclaimed Material: rubber inner tube, button
Other/New Material: none 
Tools: scissors, needle, thread, tape, paper

How I did it: I used three strips of inner tube a little bit wider than 1/4" and 25" long each. I wrapped a small piece of tape around the three pieces on one end then did a regular braid and taped off the end. I fit the band to my head and stitched the ends that were overlapping. I wrapped an extra strip of rubber around the overlapping ends to cover them and did a small stitch to hold the cover in place. For the flower, I cut out my pattern on the paper then cut out two flowers using a wide piece of inner tube. Both flowers were sewn onto the headband then I found a coordinating button from my random box of buttons that everyone seems to have and sewed it on top of the flowers.

What I would do differently: Braiding the band looked nice, but the rubber strips kept twisting and the band curls up. I think doing a round braid or just using wider strips would work just as well.

Sunday, January 29, 2012

01/28/2012 - Rubber "Film Strip" Cufflet

Third time is a charm...sometimes. My first try was a macrame-type bracelet from strips of inner tube that I just could not get to work just right. The second was using an X-acto knife to cute shapes into the rubber and still didn't look right. Finally, I just used a square craft punch and it turned out to look like a film strip.
 
Reclaimed Material: rubber inner tube, ribbon, snaps from SCRAP
Other/New Material: electrical tape
Tools: scissors, square craft punch, hammer and snap setter, hole punch

How I did it: I cut a piece of inner tube 1.25" x 8.25" for the base of the cufflet. I used the square craft punch and punched 5 squares evenly spaced on the rubber, leaving about an inch of rubber on both ends to set the snaps. I cut the ribbon 9.25" long and folded each end under .5" and lined it up with the rubber to make sure it was seen through the squares. I punched the holes for the snap placement through the ribbon and rubber and set the snaps. I cut the electrical tape into this strips and used the strips to hold the ribbon in place lengthwise.

What I would do differently: After I punched the squares and put the ribbon behind the rubber, it reminded me of film strip. I think it would be fun to use actual film instead of ribbon. I am also going to revisit my first two attempts for this day. I am 99% sure that other inner tube pieces I have seen are laser cut because I have tried for years to make intricate cuts into the rubber.