Showing posts with label bracelet. Show all posts

Sunday, October 21, 2012

07/01-07/18/2012

07/01/2012 -Rubber Band Headband
July 1st was a busy day for me. I worked all day then rushed home to get ready for my hubby to take me out for my wonderful birthday dinner. I didn't think I would want to work on anything after my hot date, so I did this project in the car ride to the restaurant. I cut 1/4" segments along the width of the tube. (If you are in a pinch and need rubber bands and have an inner tube, just cut the size you want by cutting through the width of the tube.) Then started pulling one band through the other to connect them together. I don't know how to describe the process, but when I got to the end I had to use a long strip to tie the ends together.


07/02-06/2012 - Really Big Inner Tube Basket
This is an offshoot from my 12 basket project for my sister-in-law. I love this giant size (2'x3') but the frame was too weak to support the rubber. This will be revisited with a stronger frame. Well, revisited four times since four baskets are needed.


07/07/2012 - Zoe's Lacey Skirt
This is another adult sized skirt that was stuck in with fabric at a fabric pricing party at SCRAP a few months prior. Zoe, of course, looks adorable wearing it. It reminds me of a girly steampunk skirt and I want to make a matching fitted vest and little top hat to go with it.


07/08/2012 - Practice Rubber Wrist Cuff
Wrist cuffs seem to be my "go to" craft. I think it was the first of my daily crafts. I made a practice cuff to lead a craft for Destination DIY's "Makin' It" Event on July 18th.


07/09-12/2012 - Camping Roll Slings
We have those wonderful self-inflating bed roll mattress thingies. The problem is containing them when not in use. I created a yoga mat-type sling to carry them and keep them together, out of, yes, you guessed it, rubber inner tubes. There are some kinks to be worked out, but I was happy with how they turned out. I got them done in time for out family camping trip.


07/13/2012 -Beer Can Lantern
Considering I freehand cut this lantern with a camping knife it didn't turn out too shabby. The ribbon I hung it from didn't seem like a good idea to combine with a citronella candle though.


07/14/2012 - Glow Bottle
I had read on Pinterest comment that you could make a glow bottle by opening a glow stick and pouring it in a water bottle filled with water. WRONG! I emptied about 6 glow sticks into a half filled water bottle before I finally gave up. All I could think of was those funny "nailed it" memes when people try to copy things from Pinterest. No photo of the lameness, but my sister-in-law did a hilarious thing where she taped glow sticks to herself to look like a stick figure lady. When it got really dark we walked around the campground cracking people up.


07/15/2012 - Rubber Wrist Cuffs
I was pretty pooped after getting home from our trip and made a simple rubber cuff to use as a sample for the Makin' It DIY event.
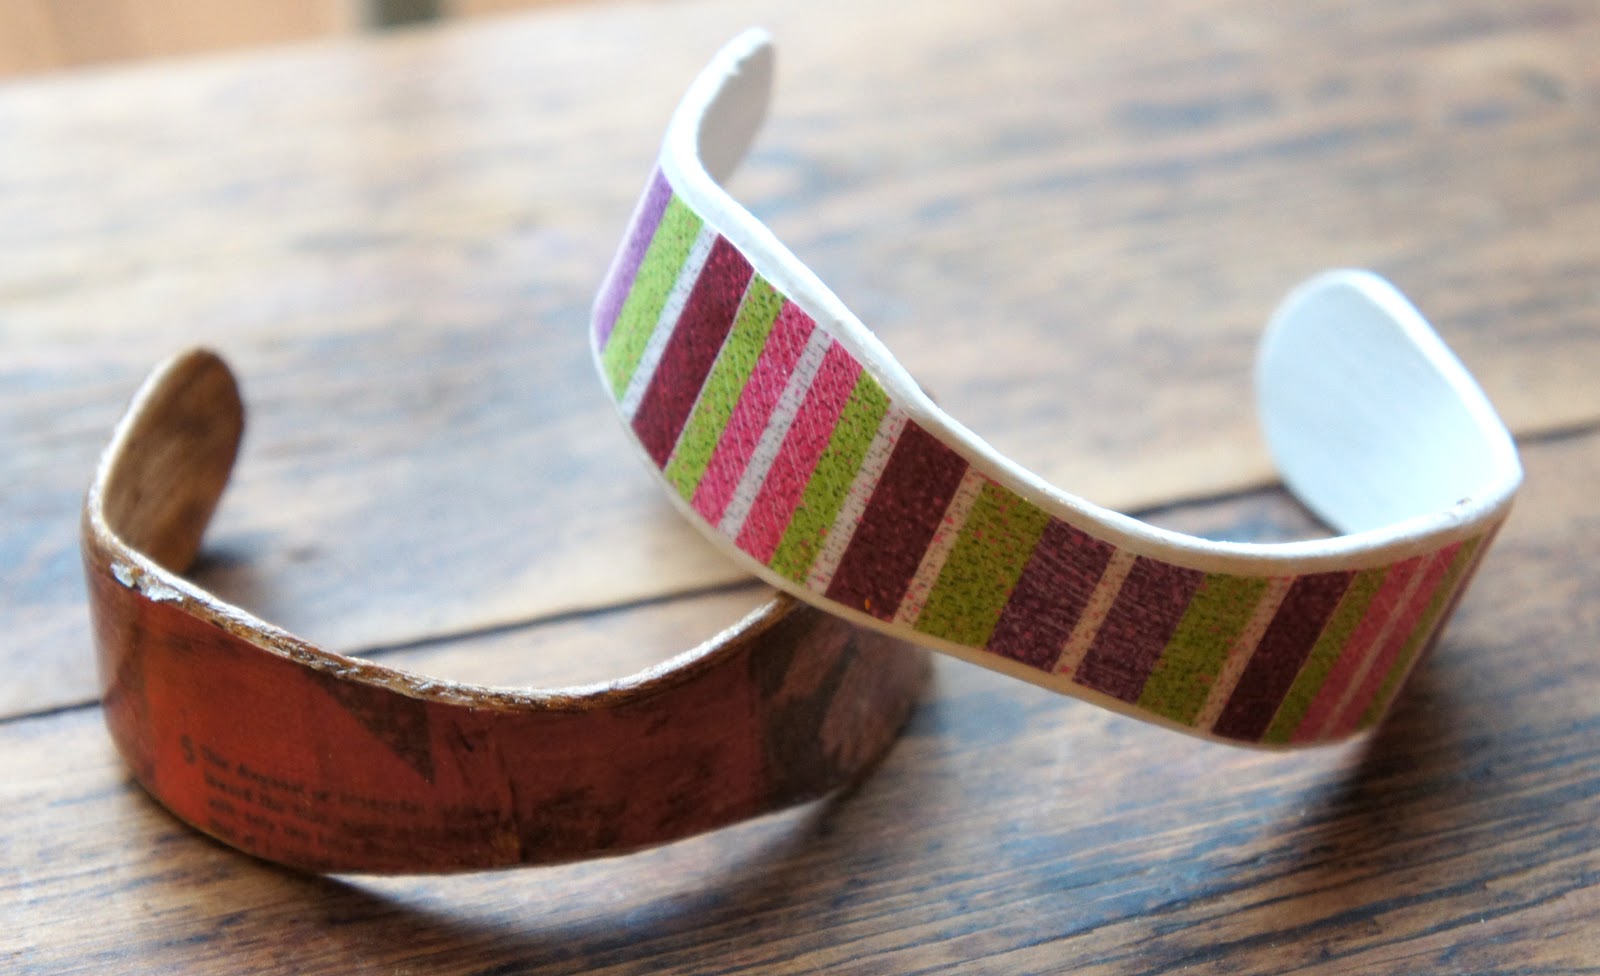


07/16/2012 - Wooden Bracelets
Another Pinterest attempt. I like how these turned out for the most part, but the white one didn't keep it's shape so it is too big to wear. I started the soaking process before the camping trip. Here are the instructions to give it a try: Wooden Bracelets.


07/17-18/2012 - More Wrist Cuffs 

I made a couple more examples of cuffs and led a quick tutorial at the Makin' It DIY event on the 18th. I didn't realize until a couple weeks later and had it pointed out by someone that this is not the peace symbol I intended. It was a big "duh" moment that I was showcasing an upcycled rubber cuff promoting the Mercedes Benz logo.

Sunday, April 1, 2012

03/16/2012 - Seamstress' Bracelet

The problem with volunteering at SCRAP is that I always have to buy something. I found a vintage tape measure which led me to for metal bobbins to make this bracelet. I checked for bobbins for weeks before I hit the jackpot and found about 12 of them there.

Reclaimed Material: vintage tape measure, old bobbins
Other/New Material: snap, thread
Tools: scissors, needle

How I did it: I looped the tape measure around the middle of each bobbin and just did a simple tie off for each. I tried to make sure the bobbins were evenly spaced so having a tape measure as the base made this easier. After it was the length I wanted it to be I trimmed off the excess tape measure, but left an extra inch to fold over to attach the snap. I used black thread and lined up my stitches with the measure marks so they wouldn't stand out.

What I would do differently: I wanted to use a heavy duty snap but I didn't have the one small enough, so I ended up using a little sewing snap.

Friday, March 30, 2012

03/09/2012 - Rubber Triangle Bracelet

I wanted to try something funky with a piece of inner tube, but I am not sure this translated well from the mental picture I had of this. This is kind of geometric, 80s-ish. I can't help but think of Jem and the Holograms. Wow, that makes me sou

Reclaimed Material: rubber inner tube
Other/New Material: none
Tools: scissors, X-acto knife 

How I did it: I cut a long triangle from the rubber long enough to fit around my wrist with a little bit of overlap. I cut two vertical slits on the short side of the triangle for the point to fit in.

What I would do differently: I should have cut the triangle longer. The point pulls out of the slits a bit. OK, sorry, that sounds worse than I mean it to, I am now getting my mind out of the gutter. This is really boring and needs some pizazz...glitter? sparkles? diamonds?

Wednesday, March 14, 2012

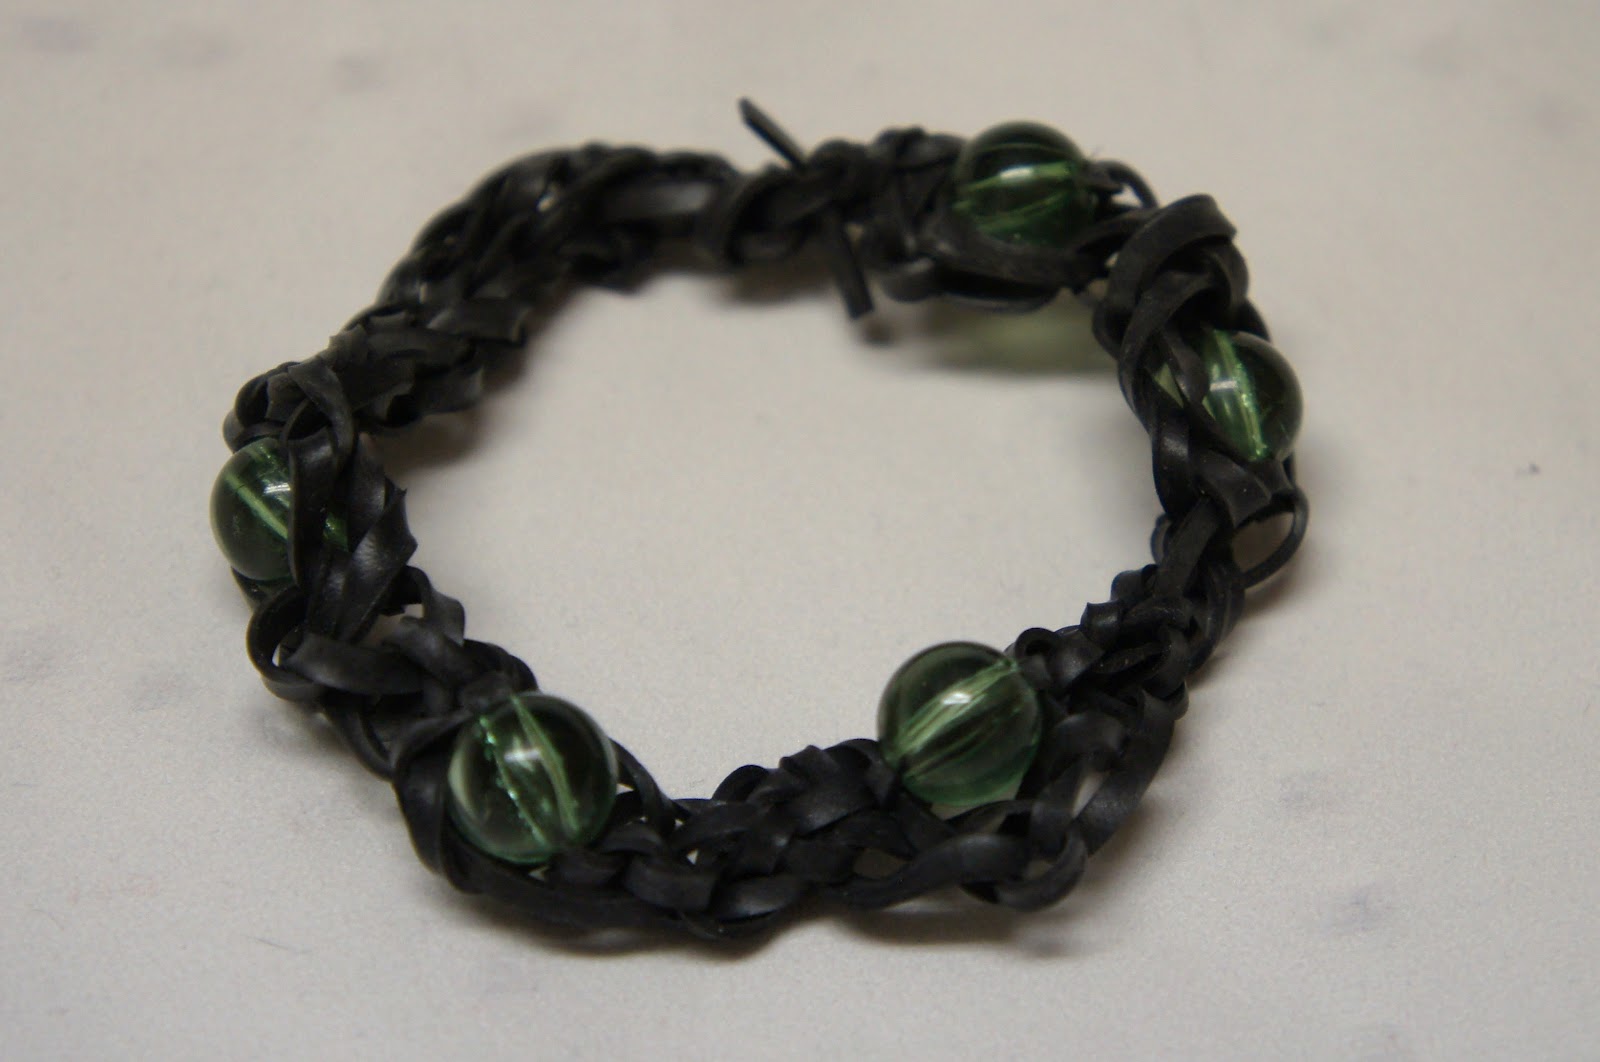
02/15/2012 - Crocheted Rubber Bracelet

Time to catch up on my posts...no more traveling, research papers or sick kids! I had to dust off my crochet skills to do this project. I have never tried a crochet project that required any deviation from the regular crochet, so this may be the fanciest thing I have crocheted.

Reclaimed Material: bicycle inner tube, beads from SCRAP
Other/New Material: none
Tools: scissors, crochet hook (J)

How I did it: I had skinny strips of rubber left over from another project. The strip I used was about 1/16" wide. I began by crocheting a regular chain stitch. I started the next line of crochet and added a bead every 4 hooks. I was going to do one more chain, but decided it didn't need it. Lastly, I tied the ends together.

What I would do differently: I will definitely try this again. Next time I will use a bigger crochet hook. It turned out a little messier than I had intended, but I still like it enough to wear it.

Sunday, January 22, 2012

01/21/2012 - Aluminum Wrist Cufflet

I don't know if the proper term for this is "cuff" or "cufflet" so I will go with cufflet because it sounds fancier. The black fabric is sexy fabric I found at SCRAP, one of my favorite places in Portland. They take donations of scrap material from businesses and individuals and resell it to fund their school and community programs. The place is an artist's/teacher's/crafter's/garbage picker's (me) dream come true. I am going next week to start my volunteer training, hooray!

Recycled Material: aluminum can, SCRAP fabric, old ribbon
Other Material: decorative brads
Tools: scissors, ruler, X-acto knife, Crop-A-Dile, double-sided tape, rubber electrical tape

How I did it: I cut the top and bottom off the aluminum can then cut a vertical line to open the can body. There is usually a line down the side of the can by the nutritional information and the print overlaps that I use as a guide to cut a straight line. I cut the can body so it was about 3.25" in height and left the length of the can, about 8" to fit my wrist. I marked the aluminum horizontally down the center .5" apart for placement of the brads, used the X-acto to poke little horizontal notches on the marks, and inserted the brads. I used the electrical tape to hold the brads in place on the back of the aluminum. I folded the top and bottom of the aluminum down towards the front a little less than .5", but did not press the aluminum all the way down until the fabric was attached. I cut the fabric 2 inches larger than the aluminum to have room for the edging. I lined the double-sided tape under the aluminum fold, taking care to make sure none would be sticking out from under the fold. I tucked one edge of the fabric under the fold so the back of the fabric stuck to the tape then wrapped the fabric over the back of the aluminum. I applied the double-stick tape to the bottom fold and then trimmed down the fabric a bit to make sure the fabric would be flush with the fold when I tucked it under the aluminum. I pressed the folds flat with my hands, but pliers can be used, which helped hold the fabric in place and to make sure it adhered to the tape.

The short ends of the cuff were too thick to fold so I used the rubber electrical tape to cover the edges. I used the Crop-A-Dile to punch 3 holes and set 3 eyelets on each end of the bracelet. The final thing I did was to lace the bracelet like a corset (or shoe, but corset sounds saucier) and tie it off. 

What I would do differently: My original plan was to try to stitch the fabric to the aluminum, but I got sidetracked watching Wall•E with my family and ended up making it by hand. I still need to experiment sewing on aluminum, so that will have to happen with another project. There seem to be many things I would have done differently with this project. I don't think it was necessary to do the fold down, other than it give the fabric and tape a stronger hold. I need to use a better eyelet next time, but I used up the ones I had left. The ribbon does seem like overkill for this bracelet, so I will most likely change it out regardless. I chose the blue fabric scrap to pull out little accents of clue from the fabric, but the piece I ended up cutting didn't have blue on it.

Thursday, January 19, 2012

01/14/2012 - Pop Tab Stretchy Bracelet

Again, I am going to toot my own horn about my pop tab prowess...after working with thousands and thousands of these things, I have figured out a few tips that will make working with them much easier.

1. Make sure you wash them. If you have a large quantity, just throw them in a bucket of soapy water, rinse and spread out on a towel to dry.
2. If you are taking them off the can, push the tab back and forth so there is a clean break from the piece that attaches it to the can. Trust me, this will save you time later and you won't have to remove these pieces.
3. If you have tabs that were pulled from the can and have either the whole piece of the can connector (this piece is usually square with a circle punched in it) or sharp edges from the connector, they need to be removed. This can be done with a pair of clippers or pliers by either snipping of the piece or using the pliers to bend the connector piece back and forth to make a clean(ish) break.
4. The bottom part of the back side of tab my still have sharp edges. You can try flattening it with pliers - but this could leave marks on the front of the tab. Whenever possible make sure the back of the bottom part of the tab is covered with something (ribbon, cloth, another tab with the back sides facing) if you are going to wear the piece you are making from the tabs.

Recycled Material: aluminum pop tabs 
Other Material: beads, clear stretchy jewelry cord
Tools: scissors

How I did it: This bracelet has 24 pop tabs so I made sure that they were prepared as recommended above. I took two tabs and placed the with the back sides facing together and looped the stretchy cord a couple times and tied a knot on the left side of the bottom hole of the tabs to hold it in place. This is the first time I have used this stretchy cord and I think it is absolutely annoying. The wraps holding the tabs together kept coming loose and the tabs would get all mixed up on a string on clear cord. I have made this style bracelet many times, but always used ribbon until now. After the cord was secure I suspended a bead on the cord in the middle of the bottom hole then wrapped the cord around the right side of the bottom tab a couple times then tied a knot. I found that if you stretch this cord as you are knotting it, it will hold much better. The next thing that I did was to get two new tabs and repeat the process. The only difference is that I did wrap the cord around the left side of the bottom hole of 2nd set of tabs, but didn't knot it. I pulled the cord so that both sets of tabs were flush then wrapped the cord twice around the bottom right side of the first set and bottom left of the second. Since the tabs kept getting loose because the top was not yet secured, I used a couple clothespins to hold them together. I repeated the steps of suspending the bead and wrapping the cord. I did this for 12 sets then tied off the end, but did not close the bracelet at that time. You don't have to use 12 sets of pop tabs, you can make it as big or small as you need it. If I am making something for myself, I always try to put is on as I go along to get an idea of size....measuring is an ever smarter idea. I repeated the entire process for the top set of holes on the pop tabs. The last thing I did was tied the two ends together - top hole to top hole, bottom hole to bottom hole. I was paranoid about the cord coming loose so I must tied about six knots on both the top and bottom then trimmed the excess cord.

What I would do differently: I need to look up tips on working with this stretchy cord because there must be a smarter way to use it. I do like the stretchiness of the cord (obviously) and its transparency. In the future, I will probably weave a ribbon through the top while I am securing the bottom or vice versa to hold it in place. It also looks like I have an obsession with red beads...so I need to diversify.

01/12/2012 - Toy Wire/Faux Pearl Bangle Bracelet

If you have a child who has gotten a toy from any major manufacturer, you have most likely gone through the frustration of trying to get the toy out of the excessive over packaging while your child tries to wait as patiently as possible for said toy. I won't go on my tirade about how much wasteful packaging goes into products, but there are some interesting bits that can be reused instead of thrown away. I have been saving the plastic coated wire (I call it toy wire since I have no idea what it is really called) that holds the product to the box for the last few years now. 


Recycled Material: toy wire
Other Material: jewelry wire, faux pearls 
Tools: long nosed pliers

How I did it: This is another project I just started playing around with before I really knew how it was going to end up. The first thing I did was take two pieces of the toy wire (about 12" long) and twisted them into one piece. I repeated the process to make two of the twisty pieces. I stared at the two pieces for a while and remembered a link I checked from Pinterest that had directions for a bracelet that I thought looked neat: http://craftaytaylor.blogspot.com/2010/10/copy-cat.html. The photos gave me inspiration to make a bangle bracelet along those lines, but I may try to make a bracelet like that one another time.

I made a circle big enough to slip over my hand with both of the twisty pieces and connected the ends together. I will say that this was easier said than done. I ended up trimming about 1" off the end of one of the wires on each end of the twisty pieces -- I made sure not to cut the pieces off the same wire. I did this so I could twist the two trimmed ends together to connect it, then did the same thing to the other twisty piece. The next step I took was to string enough of the fake pearls on a piece of wire that was the size of the twisty wire and connected the wire in a circle like the other parts. I had tried wrapping the beads like the CrafTay girl's instructions at first, but it just wouldn't work. I sandwiched the three pieces (twisty wire, fake pearls, twisty wire), held them in place, then began to wrap jewelry wire around all three pieces so the wire laid between each pearl. I finished up the wrapping by wrapping the wire a few times (close together or butted up or whatever the jeweler term is) around and tucked in the end of the wire. 


What I would do differently: I liked using the toy wire, but looking back, it does not contain as much reclaimed material as I wanted and the pearls took over this piece. The good thing is that I still did reuse something that couldn't be recycled.

Wednesday, January 18, 2012

01/10/2012 - Rubber Circle Bracelet

This is one of those projects that just happened. I started cutting out rubber circles with a different project in mind, but it evolved into this bracelet. 

Recycled Material: rubber inner tube
Other Material: jewelry wire, beads

Tools: scissors, 2" round craft punch, long nose pliers


How I did it: As with most of my rubber projects, I cleaned and prepared the inner tube by slicing it open before I started cutting. I used a 2" Fiskars round craft punch to make circles - I made about 14 circles. The inner tube that I used was a tad bit thick so it took a few pressed of the punch and a little bit of pulling the circle out to make it work. I ended up using scissors to cut out the inner circle so the width around was 3/16". I then overlapped the edges of two circles and used the jewelry wire with a faux pearl strung on it to connect them. I tucked the ends of the wire between the two rubber pieces and clamped the wire down with the pliers. I wired 4 circles together like this then connected the first and last circle to make the bracelet. I then repeated this process on a separate bracelet then put one over the other so the edges of two of the circle from the top bracelet were centered over the middle of the circles on the bottom bracelet. I did not attach the two bracelets together because I think it would have made it look to "clunky".

What I would do differently: I am quite pleased with how this turned out so I wouldn't change anything on the structure of the bracelet. I used some cheap pearls left over from a project I did a few years back, so next time I will use a nicer bead. My mother-in-law suggested using silver beads, which I think would look really nice. One thing that I would love to figure out is how to drill holes in bicycle ball bearings to make beads. I asked my hubby, the bike mechanic, if this is possible and he said they are made with stainless steel and would be hard to clamp and to get the drill set to make a hole. I am stubborn though and will probably give it a try anyway...with safety glasses so I don't lose an eye.

Monday, January 16, 2012

01/09/2012 - Rubber Round Braided Bracelet

Round braiding is something I have wanted to figure out for a long time. I have only seen leather given this treatment, but thought rubber would work nicely as well.

Recycled Material: rubber bicycle inner tube
Other Material: none
Tools: scissors, safety pin

How I did it: As just about everyone does now days I turned to the internet on my quest to learn how to make a round braid. I came across some interesting instructions (even some for an adult harness made using round braids - yikes - ok, that was kind of amusing) but the clearest instructions I found were on eHow "How to Round Braid Leather". I cut the inner tube into 4 strips about 1/8" wide and about 18" long (longer than it needed to be) then followed the eHow instructions. The only thing I didn't do from the instructions was clamp it to a bench or table. Yes, I went through my friendship bracelet phase once upon a time so I just used a safety pin and pinned it to the knee of my jeans.

What I would do differently: I did try this with thinner strips originally, but they were square instead of flat so the strips kept twisting when I braided them and it was too small to tell during the braiding process. I am going to try doing this braid using more pieces and also experiment with the widths of the strips. I think it would be fun to see if I could incorporate beads into this too.

01/07/2012 - Cut Aluminum Bracelet

I consider myself to be an expert in matters related to pop tabs (trashy fashions) but this is the first time I have tried changing the tabs themselves.

Recycled Material: aluminum pop tabs
Other Material: beads, jewelry wire, bracelet closure
Tools: long nose pliers

How I did it: I snipped off the bottoms of the pop tabs but left about a and 1/8" overhand to bend over so that it turned the top of the tab into a "D" shape. I cut 14 tabs like this, then paired them up with the flat ends facing and looped jewelry wire around each pair 3 times. I did this somewhat loosely to give it a little movement. After those were done, I connected the pairs with a piece of jewelry wire with a bead on it. I only wrapped the wire around the aluminum tab once and then wrapped it tightly twice so it was tight between the bead and aluminum. Lastly, I added the jewelry closure.

What I would do differently: Next time I cut aluminum, I need to pay better attention to using pliers on them. The aluminum is so soft that the pliers left small marks on the fronts of the tabs. It kind of worked with this bracelet and gave it more character. Also, I just have the closure set to hook onto the last tab piece. Next time or if I feel the need I will add a loop for the closure. It works, but I think it does not look as finished.

Thursday, January 12, 2012

01/03/2012 - Plastic Ring Bracelet

If you like Dr. Pepper, you may recognize these rings. I have been saving these rings for while now trying to come up with something fun to do with them. This would probably be a great project for kids, except using ribbon or yarn to connect the rings instead of jewelry wire.
Recycled Material: plastic bottle rings
Other Material: jewelry wire
Tools: long nose pliers with clippers, cuticle clippers, thin barrel (like a pencil)

How I did it: First I prepared the jewelry wire by creating little rings by tightly wrapping the wire around a pencil and created 10 rings (I made a couple extra in case I messed anything up). I slid the wire off and snipped each of the pieces in the same spot with the needle nose pliers. I am a newbie at wire wrapping, but I was told that you open the ring one toward you and one away from you. If you pull it open outwardly it won't ever close back properly.
All of the rings had sharp little notches inside them so I used the cuticle clipper to snip them off...and that really was not fun. If you decide to try this, I highly recommend using plastic rings without the sharp notches. I attached the rings using the wire rings I made. I also clamped done around the wire rings to help make them stronger...also something I had heard.

What I would do differently: Unless I am really bored, I won't use the sharp notched rings again. Milk rings and other plastic rings aren't as aggressive as the Dr. Pepper bottle rings.