Wednesday, January 18, 2012

01/11/2012 - Pink Fused Plastic Gift Bag

I got a pink plastic bag from a local cake decorating shop (yes, I forgot my reusable bag) and it seemed wrong not to make it into something else. I have tried unsuccessfully to make fused plastic crafts before so I am happy this finally worked.

Recycled Material: pink plastic bag
Other Material: none 
Tools: iron and board, scissors, tape measure or ruler, scrap cotton or linen, 2" thick box 

How I did it: The first thing I did was flatten the bag (about 18"x24") and trimmed off a long strip from the side 2" thick for the handle. After my iron was hot I laid the remaining part of the bag on the ironing board and covered it with the cloth, then ironed the bag to fuse the sides together. If you try this, make sure you keep the iron moving or you will have a plasticy mess on your hands, not to mention the smell. I ironed the piece for a few seconds then let the plastic rest for a moment before peeling off the cloth. The plastic shrunk about a third of the size and hardened a bit. I think it would have hardened more if I kept ironing, but I didn't want it to be too stiff. It was also puckered and wrinkled, so I will need to keep practicing to figure out other textures. Then I ironed the long strip for the handle to the texture I wanted.

I trimmed the large piece of plastic to 9"x10" then measured and marked 4" in on both ends of the 10" side  and folded them up to be the front and back of the bag. The plastic was surprisingly easy to crease. Next I measured and cut 2" in on each crease then folded the 2" pieces all around then folded the pieces to overlap like a "U" shape looking at it from the side. This is where it got tricky and the 2" thick box came in (I had to cut a small box to use). I put the box inside the bag and butted it up against the 2" side and covered the plastic with the cloth to fuse the flaps together with the iron. I made sure the sides were fused before adding the handle. This part took a longer to fuse because of the thickness and (I am assuming) because the plastic had cooled. I then put the handle inside the bag centered on the 2" piece then fused it with iron the same way and repeated it on the other side.

What I would do differently: I need to spend more time fusing different types of plastic. There really isn't anything I would do differently since it was a simple concept that was a little harder to execute than I expected.

01/10/2012 - Rubber Circle Bracelet

This is one of those projects that just happened. I started cutting out rubber circles with a different project in mind, but it evolved into this bracelet. 

Recycled Material: rubber inner tube
Other Material: jewelry wire, beads

Tools: scissors, 2" round craft punch, long nose pliers


How I did it: As with most of my rubber projects, I cleaned and prepared the inner tube by slicing it open before I started cutting. I used a 2" Fiskars round craft punch to make circles - I made about 14 circles. The inner tube that I used was a tad bit thick so it took a few pressed of the punch and a little bit of pulling the circle out to make it work. I ended up using scissors to cut out the inner circle so the width around was 3/16". I then overlapped the edges of two circles and used the jewelry wire with a faux pearl strung on it to connect them. I tucked the ends of the wire between the two rubber pieces and clamped the wire down with the pliers. I wired 4 circles together like this then connected the first and last circle to make the bracelet. I then repeated this process on a separate bracelet then put one over the other so the edges of two of the circle from the top bracelet were centered over the middle of the circles on the bottom bracelet. I did not attach the two bracelets together because I think it would have made it look to "clunky".

What I would do differently: I am quite pleased with how this turned out so I wouldn't change anything on the structure of the bracelet. I used some cheap pearls left over from a project I did a few years back, so next time I will use a nicer bead. My mother-in-law suggested using silver beads, which I think would look really nice. One thing that I would love to figure out is how to drill holes in bicycle ball bearings to make beads. I asked my hubby, the bike mechanic, if this is possible and he said they are made with stainless steel and would be hard to clamp and to get the drill set to make a hole. I am stubborn though and will probably give it a try anyway...with safety glasses so I don't lose an eye.

Monday, January 16, 2012

01/09/2012 - Rubber Round Braided Bracelet

Round braiding is something I have wanted to figure out for a long time. I have only seen leather given this treatment, but thought rubber would work nicely as well.

Recycled Material: rubber bicycle inner tube
Other Material: none
Tools: scissors, safety pin

How I did it: As just about everyone does now days I turned to the internet on my quest to learn how to make a round braid. I came across some interesting instructions (even some for an adult harness made using round braids - yikes - ok, that was kind of amusing) but the clearest instructions I found were on eHow "How to Round Braid Leather". I cut the inner tube into 4 strips about 1/8" wide and about 18" long (longer than it needed to be) then followed the eHow instructions. The only thing I didn't do from the instructions was clamp it to a bench or table. Yes, I went through my friendship bracelet phase once upon a time so I just used a safety pin and pinned it to the knee of my jeans.

What I would do differently: I did try this with thinner strips originally, but they were square instead of flat so the strips kept twisting when I braided them and it was too small to tell during the braiding process. I am going to try doing this braid using more pieces and also experiment with the widths of the strips. I think it would be fun to see if I could incorporate beads into this too.

01/08/2012 - Aluminum Ring Box

I was inspired to make this by an old (probably at least 40 year old) aluminum cookie tin my grandmother-in-law has.

Recycled Material: aluminum can
Other Material: none
Tools: long nose pliers, scissors and/or knife

How I did it: My aversion to patterns kicked in with this project and I just started cutting. First I made sure the can was rinsed out - nothing worse than a sticky soda can...well, there are worse things, but sticky cans are not any fun. I used a knife to saw the can as close to the top as I could. The first side you cut off is easy because it is still stiff, but once the top is cut off, the can gets flimsy and it is easier to just cut the rest with scissors. I used scissors to cut the aluminum straight down to the bottom the cut the bottom off as close to the edge as I could get. I then had a lovely sheet of aluminum to work with, but I trimmed the edges because they were kind of sharp. WARNING: in case you have not worked with cutting cans before, aluminum can get very sharp when cut and can splinter off and can be worse that wood splinters to get out of your fingers. I then started folding, cutting and tucking where the pieces seemed like they should go.


What I would do differently: Sometimes I can picture how I want something to turn out in my mind and it works out beautifully--this was not one of those times. I like the idea of this project much more than how it actually turned out so I will try it again somewhere along the line, except I will make and use a pattern. Also, I got too aggressive with the pliers when I was turning the edges down causing pieces of the aluminum to break off. While I am on the subject of aluminum and it's apparent daintiness, aluminum does not like hot glue. I have tried it on past projects and it just melts right through aluminum.

01/07/2012 - Cut Aluminum Bracelet

I consider myself to be an expert in matters related to pop tabs (trashy fashions) but this is the first time I have tried changing the tabs themselves.

Recycled Material: aluminum pop tabs
Other Material: beads, jewelry wire, bracelet closure
Tools: long nose pliers

How I did it: I snipped off the bottoms of the pop tabs but left about a and 1/8" overhand to bend over so that it turned the top of the tab into a "D" shape. I cut 14 tabs like this, then paired them up with the flat ends facing and looped jewelry wire around each pair 3 times. I did this somewhat loosely to give it a little movement. After those were done, I connected the pairs with a piece of jewelry wire with a bead on it. I only wrapped the wire around the aluminum tab once and then wrapped it tightly twice so it was tight between the bead and aluminum. Lastly, I added the jewelry closure.

What I would do differently: Next time I cut aluminum, I need to pay better attention to using pliers on them. The aluminum is so soft that the pliers left small marks on the fronts of the tabs. It kind of worked with this bracelet and gave it more character. Also, I just have the closure set to hook onto the last tab piece. Next time or if I feel the need I will add a loop for the closure. It works, but I think it does not look as finished.

01/06/2012 - Still my daughter's birthday cake

Still not a recycled craft. Making cakes are quite a labor of love and take many hours to complete. I stayed up until about 3am working on the cake then I was up again at 7am to put the finishing touches on the cake and make the princess. When my daughter got up I showed her the princess I had modeled and her first question was "where is the prince?" I used marzipan for the first time to make the princess and it was surprisingly easier to use than fondant. If you like decorating your own cakes and haven't tried marzipan...I highly recommend it. I don't think I need to make any cakes for quite a while...so no more recycled craft interruptions.

01/05/2012 - Daughter's Birthday Cake

Okay, so this obviously is not recycled. I do have one exception to my New Year's resolution...when I need to make a cake, I am focusing on that instead of a recycled craft. I usually start baking the cakes two or three days before I start decorating them. I like to use fondant to cover the cakes and that takes a bit of time to prepare and color. My daughter insisted on a "purple princess cake" for her 3rd birthday.

01/04/2012 - Aluminum Tab Ring

These bigger aluminum tabs are from the tops of cat food cans and I thought they would be interesting to use for projects because of the gold-ish color. I ended up using more beads that I intended so it is not as much recycled content as I wanted but I am happy with how it turned out.

Recycled Material: aluminum tabs from cat food cans
Other Material: transparent green beads, jewelry wire
Tools: long nose pliers with clippers

How I did it: The first thing I did with the tabs was to make sure there were no sharp or ragged edges on the part that gets pulled of the can lid. I arranged 5 tabs so that the bottoms overlapped (when working with tabs I refer to the tops as the smooth side that is pulled and the bottoms as the part that is attached to cans) and arranged the tops like flower petals and wrapped copper-colored wire around the 5 bottoms to hold them in place. I used one long piece of wire and then strung (stringed?) 10 beads on the same wire used to hold the tabs in place. Then made a circle with the bead/wire to cover the bottoms of the tabs and wrapped the excess wire every 2 or 3 beads to attach it to the tab bottoms. Next I took another tab and used the pliers to snip off the bottom leaving about 1/8" to bend so that I had an oval and no jagged edges. Then I attached the oval ring on top of the other tabs and the beads, again using the same piece of wire. I ran out of my long piece of wire at this point and used a new piece and strung 5 beads and again circled them to cover the oval ring then pulled the wire down the center and pulled it around on two opposite sides. With the remaining wire I pulled it down the center again and wrapped it around the other pieces of wire to hold it and tucked the end in with the pliers so it wouldn't poke out. For the final step I strung one bead and bent the wire so I could pull the two ends down the center. Then I wrapped one end in a circle three times for the ring base. I used my finger as a guide for sizing. Then I wrapped the two ends between the base and the top, again tucking in the ends.

What I would do differently: First of all, I need to practice my wiring, beading and jewelry making, but overall I am happy with how this turned out.

Thursday, January 12, 2012

01/03/2012 - Plastic Ring Bracelet

If you like Dr. Pepper, you may recognize these rings. I have been saving these rings for while now trying to come up with something fun to do with them. This would probably be a great project for kids, except using ribbon or yarn to connect the rings instead of jewelry wire.
Recycled Material: plastic bottle rings
Other Material: jewelry wire
Tools: long nose pliers with clippers, cuticle clippers, thin barrel (like a pencil)

How I did it: First I prepared the jewelry wire by creating little rings by tightly wrapping the wire around a pencil and created 10 rings (I made a couple extra in case I messed anything up). I slid the wire off and snipped each of the pieces in the same spot with the needle nose pliers. I am a newbie at wire wrapping, but I was told that you open the ring one toward you and one away from you. If you pull it open outwardly it won't ever close back properly.
All of the rings had sharp little notches inside them so I used the cuticle clipper to snip them off...and that really was not fun. If you decide to try this, I highly recommend using plastic rings without the sharp notches. I attached the rings using the wire rings I made. I also clamped done around the wire rings to help make them stronger...also something I had heard.

What I would do differently: Unless I am really bored, I won't use the sharp notched rings again. Milk rings and other plastic rings aren't as aggressive as the Dr. Pepper bottle rings.

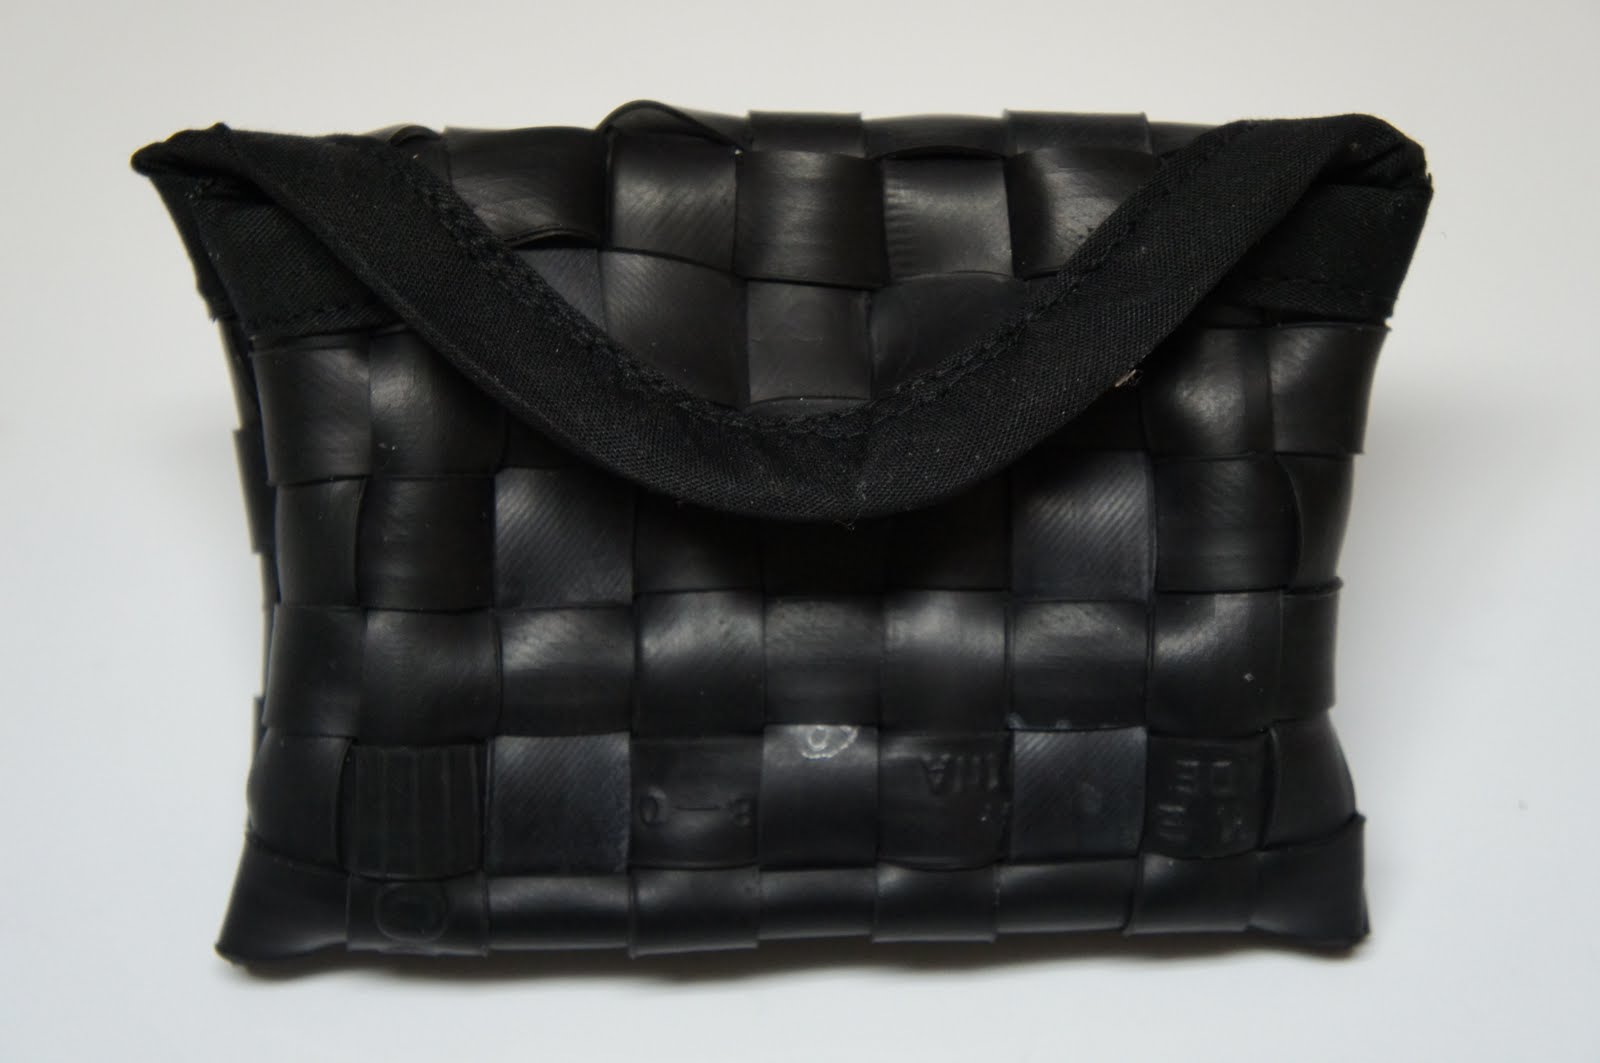
01/02/2012 - Coin Purse

Weaving rubber inner tubes is actually more difficult than it looks. I have started larger rubber weaving projects before, but got too frustrated and gave up on them. For my second project, I gave it another go...on a smaller scale. The strips of inner tube slip and don't like to stay flush with the other strips. I think this is because of the thickness. I went to SCRAP PDX last week and found a simple loom that I am going to try weaving rubber and hope it works better than taping pieces to my glass board.

Recycled Material: rubber inner tube
Other Material: heavy tape (I like using electrical tape on rubber) thread, bias tape or something for edging, snap
Tools: scissors, needle and thread or sewing machine

How I did it: I cut inner tubes into strips that are 1/2" wide. Some inner tubes (usually road bike inner tubes) have lines that measure about this width and make cutting a lot less of a headache. I find it easier to cut the length of the tire then cut down the sizes I need. Then I cut 9 of the strips to 10" lengths and 16 strips to 6/5" lengths (this will give you extra room to work and allow about 1/2" edges). The size of the finished product is 3"x4.5". As I said above, I used a glass cutting board, then taped the 9 long strips flush against each other - I only taped along the top and left the bottom loose. Then I took one of the shorter strips and wove it through the longer strips, one over and one under. Make sure the pieces of rubber are all facing the right direction. Then repeated the process for the remaining 15 strips, alternating which one started on top and vice versa. I call this making my "fabric" when working with recycled/discarded materials.

Once the "fabric" was done, I used the electrical tape to measure out the exact size of the purse - 4.5" x 8" but I only taped the bottom and two long sides up to 6". For the remaining 2" I rounded the tape starting at the 6" mark and made the highest point 8". The bottom was folded in half 3" up (inside out) and the remaining rounded 2" was left for the closure flap. I also did a simple stitch to hold the weave together on the short and rounded ends removing the electrical tape as I went along then lined the bias tape on the short ends and used a sewing machine with the tension set to "9" using a leather needle. Once the edges that were going to show were covered, I hand (back) stitched the sides 3" up with the "fabric" inside out on each side using a large needle removing the tape as I stitched (it is a pain in the you-know-what to stitch rubber by itself on my little machine so it was just easier to do it by hand).

Once the coin purse was put together, I turned it inside out then marked the placement of the snap. Originally I used a magnetic closure for it, but it was overkill and just stretched the rubber, so I removed it and used a regular sew-on snap. I hid my stitches behind the weave. I left it sitting out to take a picture of it and my sweet little 88 year-old grandmother-in-law walked up and asked me if I made it for her. How could I say "no"?

What I would do differently: I would probably do a lining because the rubber still stretches a little bit when you pull on the snap, but not as badly as it did with the magnetic closure. Like I mentioned earlier, I am going to see how the loom I got works out, otherwise I am going to have to figure out an easier solution by fashioning something homemade.